> ## Documentation Index
> Fetch the complete documentation index at: https://enterprise-docs.crewai.com/llms.txt
> Use this file to discover all available pages before exploring further.
# Microsoft Entra ID
> Step-by-step guide to configure Microsoft Entra ID (Azure AD) for CrewAI Factory authentication
## Overview
This is a requirement to install CrewAI Enterprise on an Azure environment that uses Microsoft Entra as the authentication provider.
**Installing for the first time?** Use a Deployment Guide for a complete end-to-end walkthrough including infrastructure setup, a full `values.yaml`, and post-install steps:
* [AWS EKS + Entra ID + Wharf + Studio V2](/deployment-guides/aws-entraid-wharf-studio)
* [GCP GKE + Entra ID + Wharf + Studio V2](/deployment-guides/gcp-entraid-wharf-studio)
* [Azure AKS + Entra ID + Wharf + Studio V2](/deployment-guides/azure-entraid-wharf-studio)
## Initial App Registration
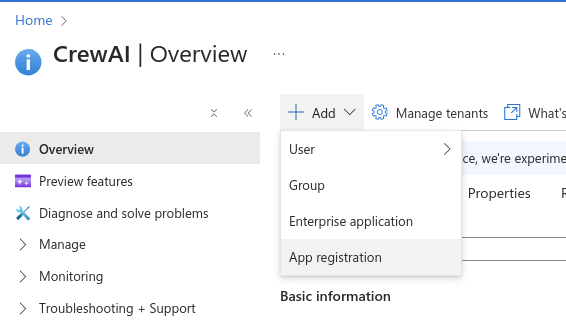
Go to [portal.azure.com](http://portal.azure.com) and select **"Microsoft Entra ID"** under **"Azure services"**. In the **"Overview"** screen, under **"Add"**, click **"App registration"**
 Fill in the fields to create the application:
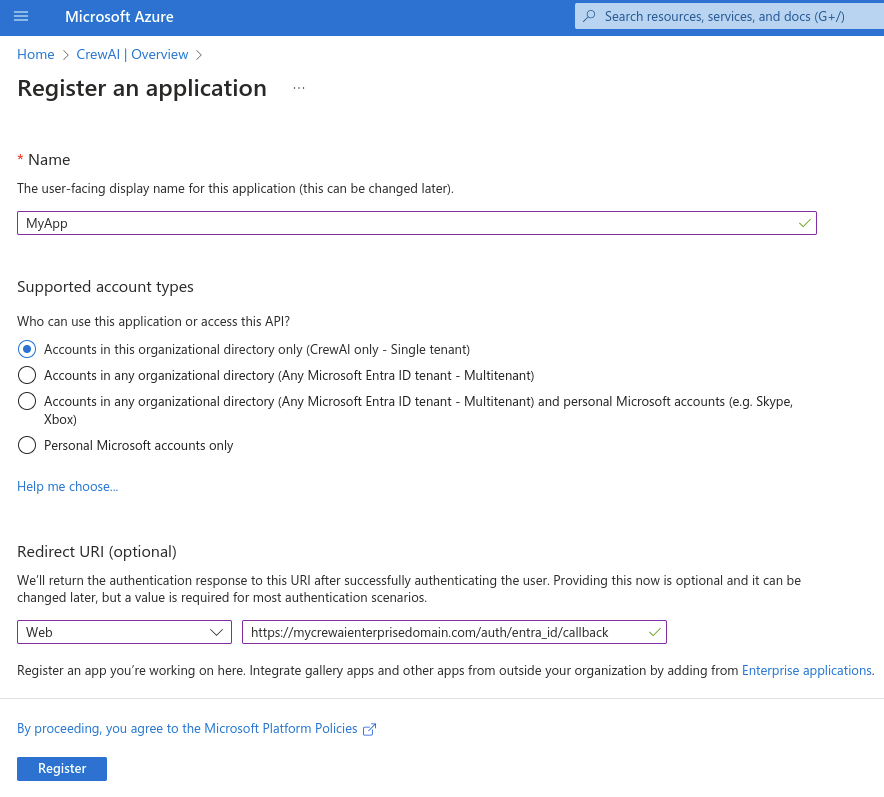 * **Name:** Choose a name for the application (Suggested: `CrewAI`)
* Under **supported account types**, choose **"Accounts in this organization directory only"**
* This will ensure that only users from this Azure organization will be able to log in into the application.
* **Redirect URI**
* In the **"select a platform"**, choose **"web"**
* Fill in the redirect URI with your application domain + `/auth/entra_id/callback`
* e.g. `https://crewai.thedomain.com/auth/entra_id/callback`
The redirect URI must be `https:///auth/entra_id/callback`. This must be configured in Azure before running `helm install` — authentication will fail at login if it is missing or incorrect.
When finished, click **"Register"**.
## Collecting Credentials
In the app details page, grab the values **"Application (client) ID"** and **"Directory (tenant) ID"**
* **Name:** Choose a name for the application (Suggested: `CrewAI`)
* Under **supported account types**, choose **"Accounts in this organization directory only"**
* This will ensure that only users from this Azure organization will be able to log in into the application.
* **Redirect URI**
* In the **"select a platform"**, choose **"web"**
* Fill in the redirect URI with your application domain + `/auth/entra_id/callback`
* e.g. `https://crewai.thedomain.com/auth/entra_id/callback`
The redirect URI must be `https:///auth/entra_id/callback`. This must be configured in Azure before running `helm install` — authentication will fail at login if it is missing or incorrect.
When finished, click **"Register"**.
## Collecting Credentials
In the app details page, grab the values **"Application (client) ID"** and **"Directory (tenant) ID"**
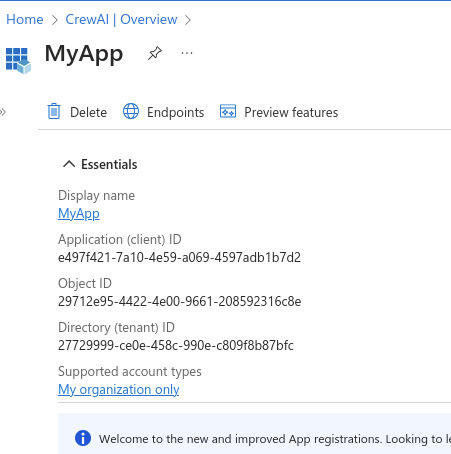 You can also access this page through the left sidebar of under **"App registrations"** and then clicking your app name in the list that is shown.
## Creating Client Secret
On the left sidebar of the app details page, under **"Manage"**, access **"Certificates & Secrets"**, and create a new client secret.
On the right panel that appears, write in the description of that secret (e.g. *CrewAI Enterprise*) and choose the expiration date. Click **"Add"** to create the secret.
You can also access this page through the left sidebar of under **"App registrations"** and then clicking your app name in the list that is shown.
## Creating Client Secret
On the left sidebar of the app details page, under **"Manage"**, access **"Certificates & Secrets"**, and create a new client secret.
On the right panel that appears, write in the description of that secret (e.g. *CrewAI Enterprise*) and choose the expiration date. Click **"Add"** to create the secret.
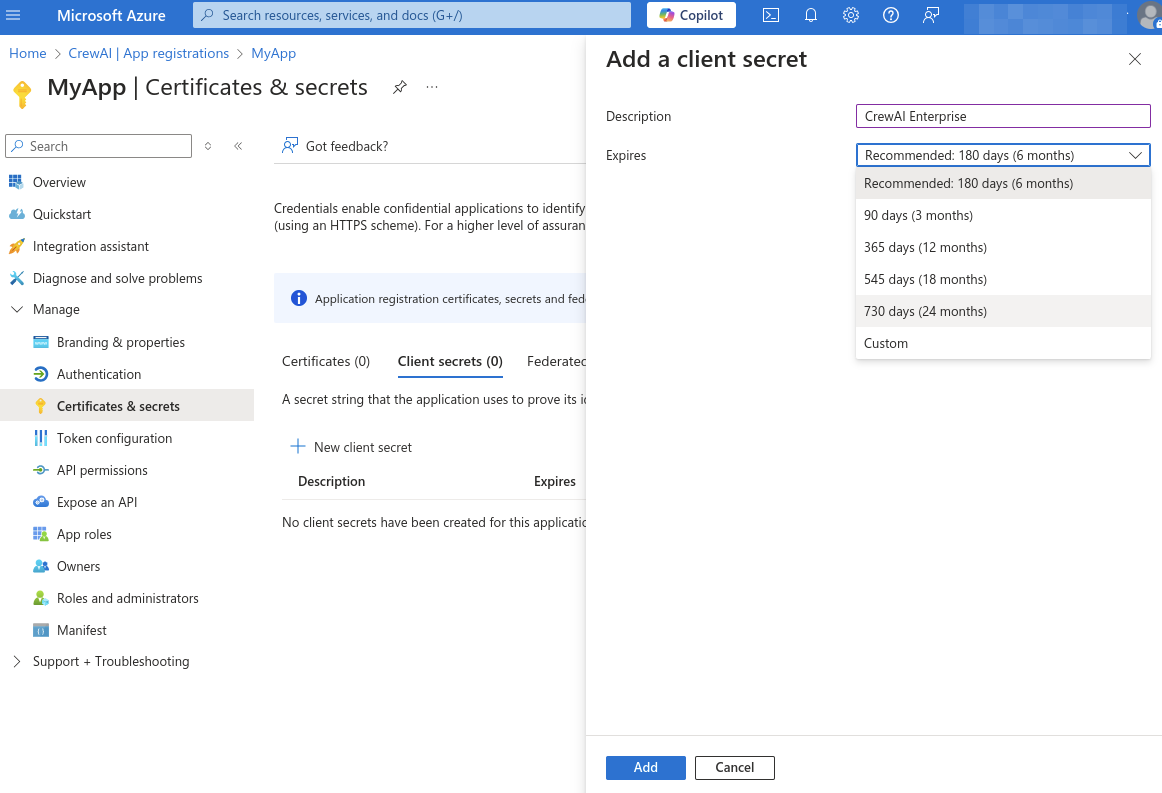 Now copy the client secret. Note that if you leave this page without copying the secret, you won't be able to see it again and will need to create another secret.
 ## Granting Admin Consent
Go back to Azure portal, and under **"Azure services"**, go to **"Enterprise applications"**. Under **"All applications"**, choose the app that was just created.
In the left sidebar, under **"Security"**, click **"Permissions"**. In the screen that appears, click **"Grant admin consent for CrewAI"**.
## Granting Admin Consent
Go back to Azure portal, and under **"Azure services"**, go to **"Enterprise applications"**. Under **"All applications"**, choose the app that was just created.
In the left sidebar, under **"Security"**, click **"Permissions"**. In the screen that appears, click **"Grant admin consent for CrewAI"**.
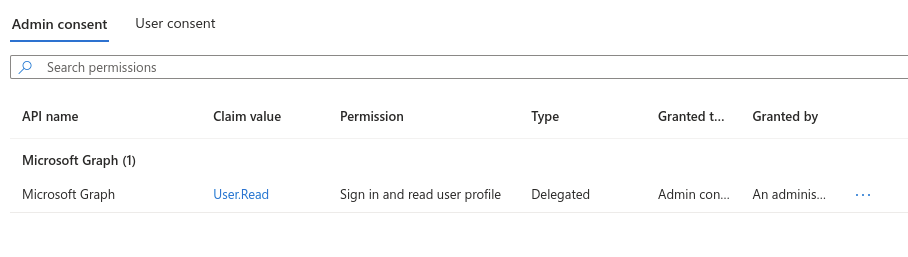
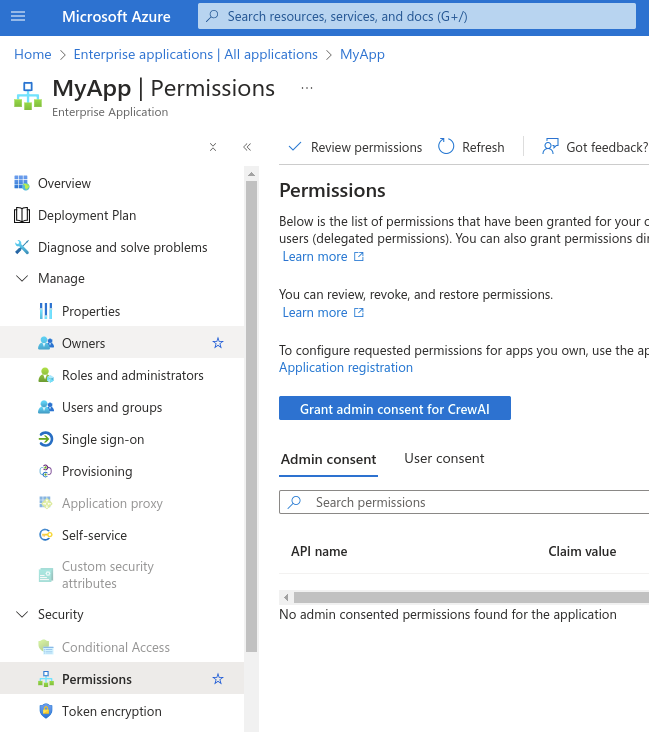 Admin consent should be granted for Microsoft Graph to **User.Read**. This is how it should be looking in the end:
 ## Configuring App Roles
App Roles allow Entra ID to communicate each user's role directly to CrewAI Factory via the JWT token. This is the recommended way to grant admin panel access to Entra ID users — no additional commands are needed after login.
Go back to **"App registrations"** and select your app. In the left sidebar, under **"Manage"**, click **"App roles"**, then **"Create app role"**.
Create the following two roles:
| Display name | Value | Description | Allowed member types |
| ------------- | --------------- | ---------------------- | -------------------- |
| Member | `member` | Regular platform users | Users/Groups |
| Factory Admin | `factory-admin` | Admin panel access | Users/Groups |
For each role, ensure the **"Do you want to enable this app role?"** checkbox is checked before saving.
The `member` role value is not checked anywhere in the app — it is purely a way to grant login access when "Assignment required" is enabled. Only `factory-admin` grants admin panel access.
## Configuring User Access
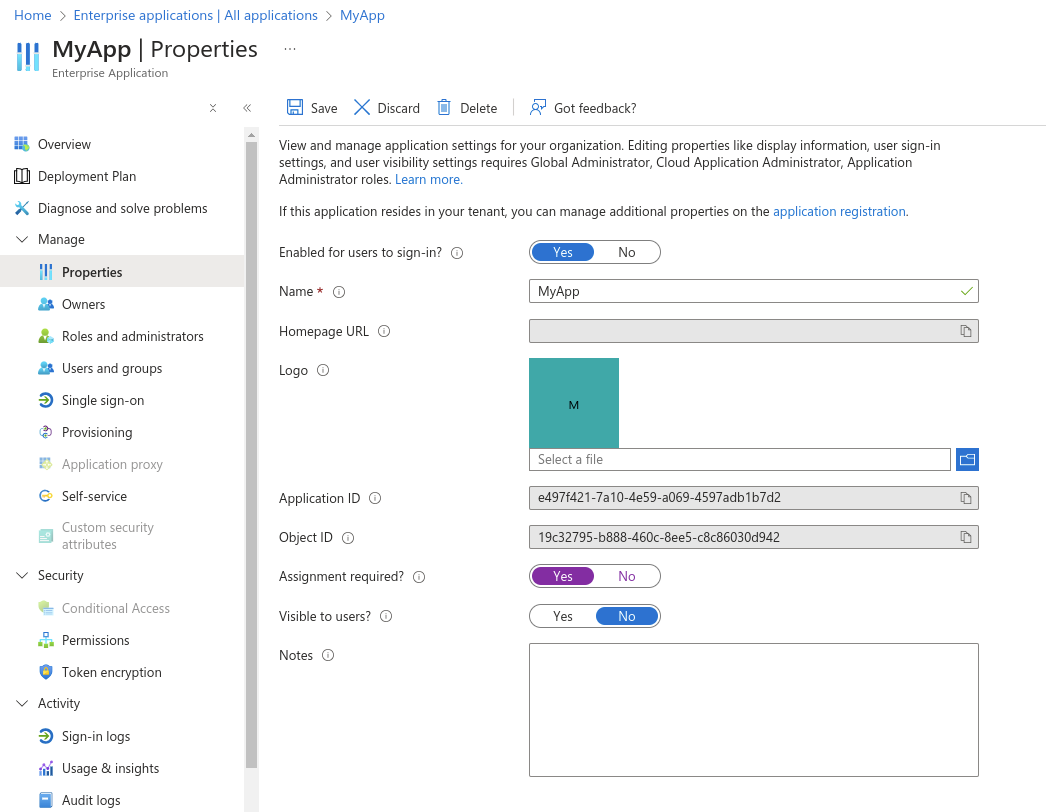
In the left sidebar, under **"Manage"**, go to **"Properties"**, and set the **"Assignment required?"** option to **"Yes"**. This will set up the application to only be accessed by only specific users and groups. After doing the changes, click **"Save"**.
## Configuring App Roles
App Roles allow Entra ID to communicate each user's role directly to CrewAI Factory via the JWT token. This is the recommended way to grant admin panel access to Entra ID users — no additional commands are needed after login.
Go back to **"App registrations"** and select your app. In the left sidebar, under **"Manage"**, click **"App roles"**, then **"Create app role"**.
Create the following two roles:
| Display name | Value | Description | Allowed member types |
| ------------- | --------------- | ---------------------- | -------------------- |
| Member | `member` | Regular platform users | Users/Groups |
| Factory Admin | `factory-admin` | Admin panel access | Users/Groups |
For each role, ensure the **"Do you want to enable this app role?"** checkbox is checked before saving.
The `member` role value is not checked anywhere in the app — it is purely a way to grant login access when "Assignment required" is enabled. Only `factory-admin` grants admin panel access.
## Configuring User Access
In the left sidebar, under **"Manage"**, go to **"Properties"**, and set the **"Assignment required?"** option to **"Yes"**. This will set up the application to only be accessed by only specific users and groups. After doing the changes, click **"Save"**.
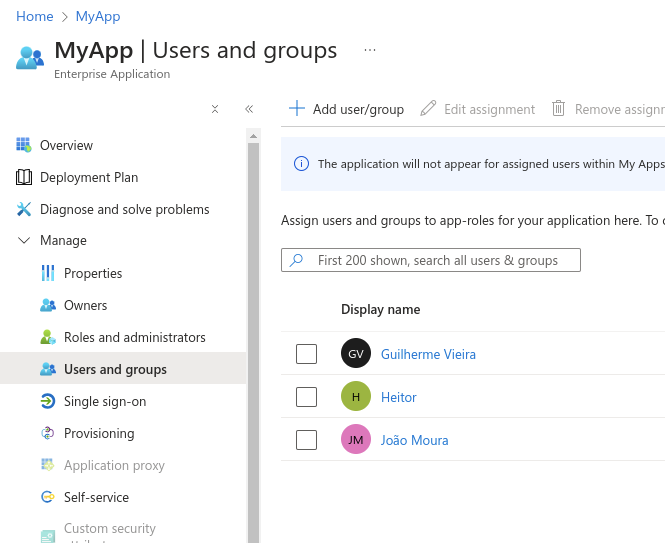
 In the left sidebar, under **"Manage"**, now click **"Users and groups"**. There we can assign specific users or whole groups to access the application. Users that are not assigned here will not be able to log in into the CrewAI enterprise platform. Click **"Add user/group"** and select desired users/groups, assigning the appropriate role to each:
* **Regular users** → select the **Member** role
* **Admin users** → select the **Factory Admin** role
In the left sidebar, under **"Manage"**, now click **"Users and groups"**. There we can assign specific users or whole groups to access the application. Users that are not assigned here will not be able to log in into the CrewAI enterprise platform. Click **"Add user/group"** and select desired users/groups, assigning the appropriate role to each:
* **Regular users** → select the **Member** role
* **Admin users** → select the **Factory Admin** role
 App Roles are included in the JWT automatically — no additional OAuth scopes are needed. After login, you can verify the token contains the expected `roles` claim (e.g. `"roles": ["factory-admin"]` for admin users).
## Environment Variables
Application setup in Azure portal is finished. Now, with the credentials obtained in the previous steps, configure them in your Helm values file when deploying the CrewAI enterprise application.
### Helm Values Configuration
`ENTRA_ID_CLIENT_ID` and `ENTRA_ID_TENANT_ID` are non-sensitive identifiers that belong under `envVars:`. Only `ENTRA_ID_CLIENT_SECRET` is a credential and belongs under `secrets:`. Placing them under `secrets:` stores the values in a Kubernetes Secret but the chart template does not inject Entra ID values from the secrets section into pod environment variables. The result is a silent authentication failure — the pod starts normally but all login attempts fail because CLIENT\_ID and TENANT\_ID are absent from the pod environment.
```yaml theme={null}
envVars:
AUTH_PROVIDER: "entra_id"
ENTRA_ID_CLIENT_ID: ""
ENTRA_ID_TENANT_ID: ""
secrets:
ENTRA_ID_CLIENT_SECRET: ""
```
## Helm Chart Configuration
The following is a complete, working Helm values snippet with all required Entra ID values in their correct sections:
```yaml theme={null}
envVars:
AUTH_PROVIDER: "entra_id"
ENTRA_ID_CLIENT_ID: "" # from App Registration overview
ENTRA_ID_TENANT_ID: "" # from App Registration overview
# Optional: required only if enabling CLI login (see section below)
# ENTRA_ID_DEVICE_AUTHORIZATION_CLIENT_ID: ""
# ENTRA_ID_CUSTOM_OPENID_SCOPE: ""
secrets:
ENTRA_ID_CLIENT_SECRET: "" # from Certificates & Secrets
```
`ENTRA_ID_CLIENT_ID` and `ENTRA_ID_TENANT_ID` are non-sensitive identifiers that belong under `envVars:`. Only `ENTRA_ID_CLIENT_SECRET` is a credential and belongs under `secrets:`. Placing them under `secrets:` stores the values in a Kubernetes Secret but the chart template does not inject Entra ID values from the secrets section into pod environment variables. The result is a silent authentication failure — the pod starts normally but all login attempts fail because CLIENT\_ID and TENANT\_ID are absent from the pod environment.
`oauth.enabled` is NOT required for Entra ID SSO. It controls a separate Built-In Integrations microservice for tool connections (Microsoft 365 Outlook, OneDrive, Teams). If you want those tool integrations, see the [Microsoft 365 Integrations guide](/features/microsoft-integrations). Entra ID SSO works without `oauth.enabled: true`.
## Combining With Other Features
* **Wharf (trace collection)**: No additional values needed — Wharf is enabled by default. Ensure the `wharf` database is pre-created. See [Wharf reference](/reference/chart-values/wharf).
* **Studio V2**: Configured entirely post-install via the web UI and `kubectl exec` commands. See [Enable Studio V2](/features/studio-v2).
* **Microsoft 365 integrations** (Outlook, OneDrive, Teams as tools): Requires `oauth.enabled: true` and a separate OAuth app registration. This is separate from Entra ID SSO. See [Microsoft Integrations](/features/microsoft-integrations).
* **ArgoCD / GitOps**: Auto-generated secrets must be set explicitly. See the [ArgoCD guide](/configuration/argocd).
## Optional: Enable CLI Login
This section is only required if you want to use the `crewai` CLI tool with Entra ID authentication. If you are only configuring web-based SSO, skip this section. `ENTRA_ID_DEVICE_AUTHORIZATION_CLIENT_ID` and `ENTRA_ID_CUSTOM_OPENID_SCOPE` are not needed for web login.
This will guide you in the process of updating your Entra ID setup and also the CrewAI Factory installation in order to support login from the CrewAI CLI tool.
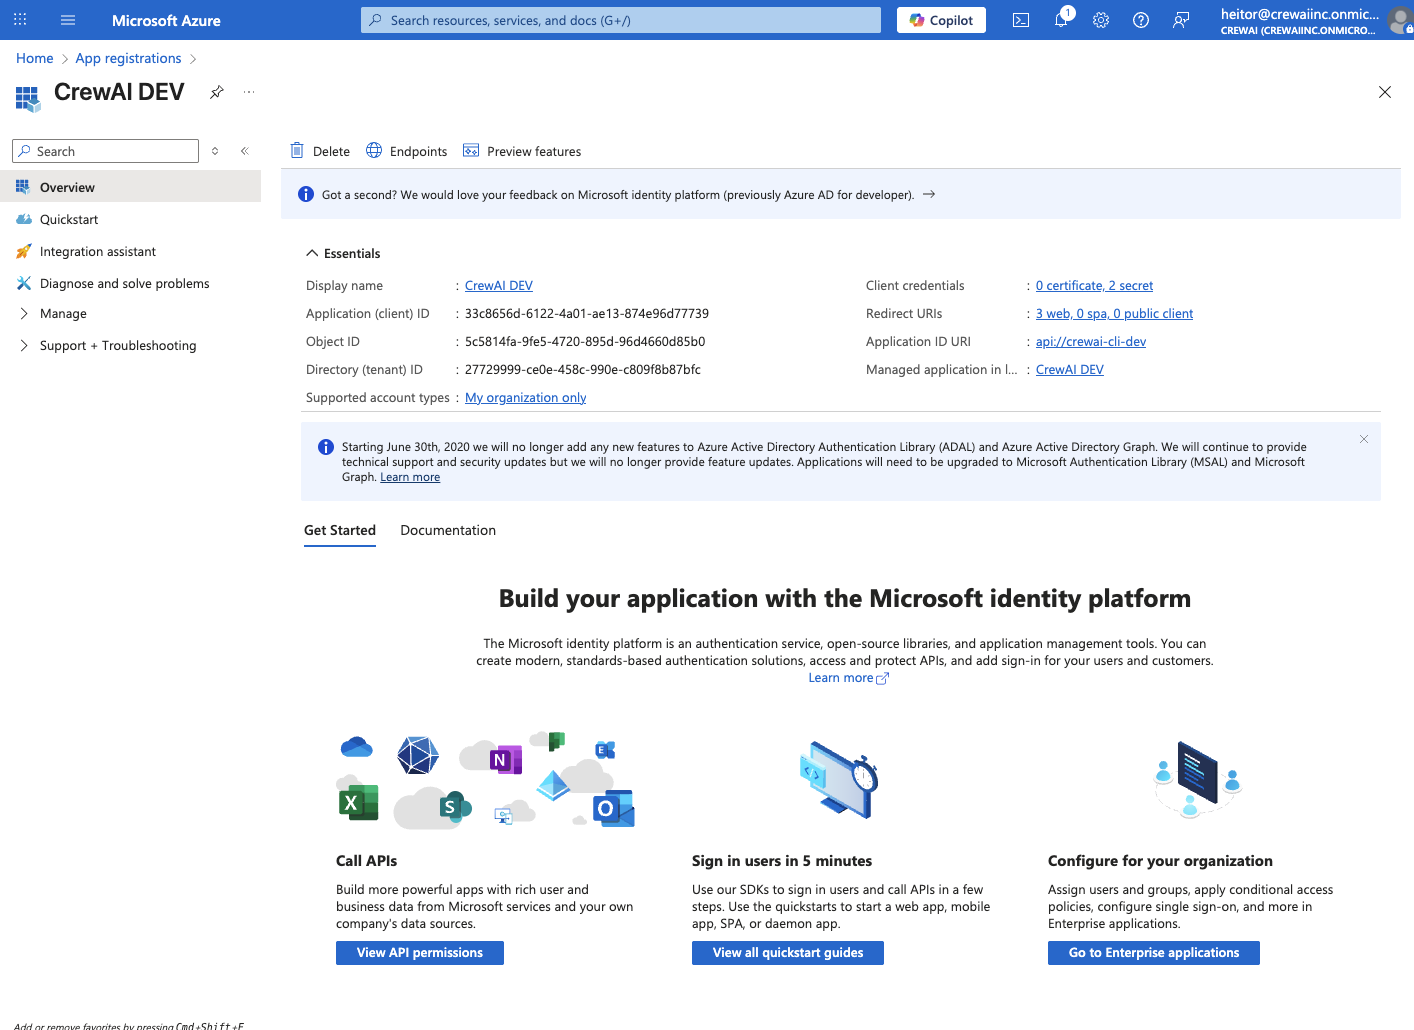
Go to [portal.azure.com](http://portal.azure.com), then **"App Registrations"** and choose the app you use for SSO authentication for the CrewAI Factory installation. In this example, it's **"CrewAI Dev"**:
App Roles are included in the JWT automatically — no additional OAuth scopes are needed. After login, you can verify the token contains the expected `roles` claim (e.g. `"roles": ["factory-admin"]` for admin users).
## Environment Variables
Application setup in Azure portal is finished. Now, with the credentials obtained in the previous steps, configure them in your Helm values file when deploying the CrewAI enterprise application.
### Helm Values Configuration
`ENTRA_ID_CLIENT_ID` and `ENTRA_ID_TENANT_ID` are non-sensitive identifiers that belong under `envVars:`. Only `ENTRA_ID_CLIENT_SECRET` is a credential and belongs under `secrets:`. Placing them under `secrets:` stores the values in a Kubernetes Secret but the chart template does not inject Entra ID values from the secrets section into pod environment variables. The result is a silent authentication failure — the pod starts normally but all login attempts fail because CLIENT\_ID and TENANT\_ID are absent from the pod environment.
```yaml theme={null}
envVars:
AUTH_PROVIDER: "entra_id"
ENTRA_ID_CLIENT_ID: ""
ENTRA_ID_TENANT_ID: ""
secrets:
ENTRA_ID_CLIENT_SECRET: ""
```
## Helm Chart Configuration
The following is a complete, working Helm values snippet with all required Entra ID values in their correct sections:
```yaml theme={null}
envVars:
AUTH_PROVIDER: "entra_id"
ENTRA_ID_CLIENT_ID: "" # from App Registration overview
ENTRA_ID_TENANT_ID: "" # from App Registration overview
# Optional: required only if enabling CLI login (see section below)
# ENTRA_ID_DEVICE_AUTHORIZATION_CLIENT_ID: ""
# ENTRA_ID_CUSTOM_OPENID_SCOPE: ""
secrets:
ENTRA_ID_CLIENT_SECRET: "" # from Certificates & Secrets
```
`ENTRA_ID_CLIENT_ID` and `ENTRA_ID_TENANT_ID` are non-sensitive identifiers that belong under `envVars:`. Only `ENTRA_ID_CLIENT_SECRET` is a credential and belongs under `secrets:`. Placing them under `secrets:` stores the values in a Kubernetes Secret but the chart template does not inject Entra ID values from the secrets section into pod environment variables. The result is a silent authentication failure — the pod starts normally but all login attempts fail because CLIENT\_ID and TENANT\_ID are absent from the pod environment.
`oauth.enabled` is NOT required for Entra ID SSO. It controls a separate Built-In Integrations microservice for tool connections (Microsoft 365 Outlook, OneDrive, Teams). If you want those tool integrations, see the [Microsoft 365 Integrations guide](/features/microsoft-integrations). Entra ID SSO works without `oauth.enabled: true`.
## Combining With Other Features
* **Wharf (trace collection)**: No additional values needed — Wharf is enabled by default. Ensure the `wharf` database is pre-created. See [Wharf reference](/reference/chart-values/wharf).
* **Studio V2**: Configured entirely post-install via the web UI and `kubectl exec` commands. See [Enable Studio V2](/features/studio-v2).
* **Microsoft 365 integrations** (Outlook, OneDrive, Teams as tools): Requires `oauth.enabled: true` and a separate OAuth app registration. This is separate from Entra ID SSO. See [Microsoft Integrations](/features/microsoft-integrations).
* **ArgoCD / GitOps**: Auto-generated secrets must be set explicitly. See the [ArgoCD guide](/configuration/argocd).
## Optional: Enable CLI Login
This section is only required if you want to use the `crewai` CLI tool with Entra ID authentication. If you are only configuring web-based SSO, skip this section. `ENTRA_ID_DEVICE_AUTHORIZATION_CLIENT_ID` and `ENTRA_ID_CUSTOM_OPENID_SCOPE` are not needed for web login.
This will guide you in the process of updating your Entra ID setup and also the CrewAI Factory installation in order to support login from the CrewAI CLI tool.
Go to [portal.azure.com](http://portal.azure.com), then **"App Registrations"** and choose the app you use for SSO authentication for the CrewAI Factory installation. In this example, it's **"CrewAI Dev"**:
 ### Enable Public Client Flows
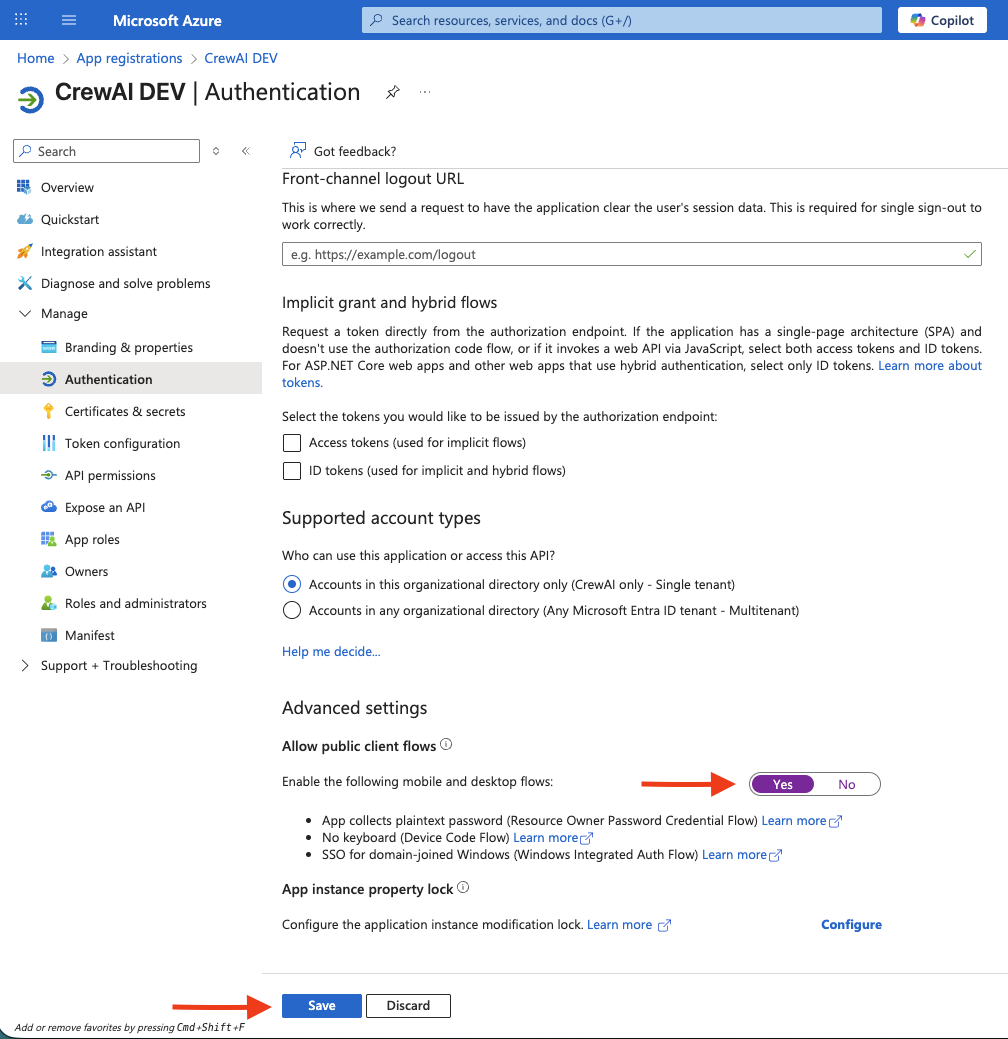
Now, under **"Manage"** > **"Authentication"** we are going to scroll down to **"Advanced Settings"** and enable the **"Allow public client flows"** option. This will allow us to use the **"device code authorization grant"** flow, which is required for native applications such as CLIs.
Change it to **"Yes"** and click **"Save"**.
### Enable Public Client Flows
Now, under **"Manage"** > **"Authentication"** we are going to scroll down to **"Advanced Settings"** and enable the **"Allow public client flows"** option. This will allow us to use the **"device code authorization grant"** flow, which is required for native applications such as CLIs.
Change it to **"Yes"** and click **"Save"**.
 ### Expose an API
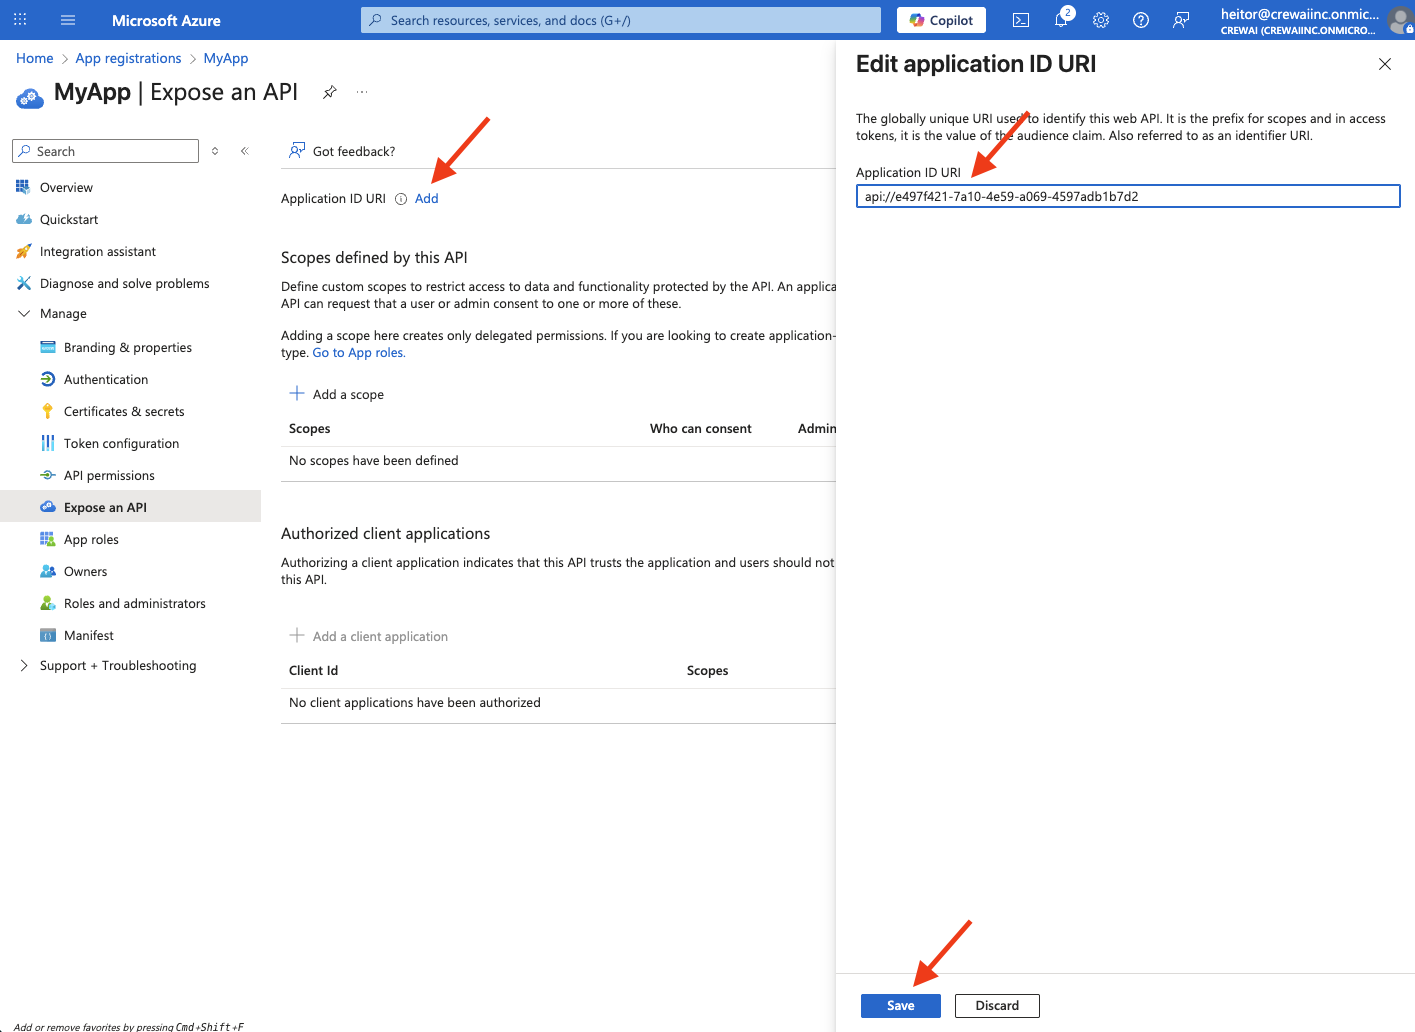
Now, we'll navigate to **"Expose and API"** on the left panel, still under **"Manage"**.
There, click on **"Add"** that is on the side of **"Application ID URI"** and create the application ID. You can use the default one that is provided or create your own. A good pattern is to start with `api://`. After that, click **"Save"**
### Expose an API
Now, we'll navigate to **"Expose and API"** on the left panel, still under **"Manage"**.
There, click on **"Add"** that is on the side of **"Application ID URI"** and create the application ID. You can use the default one that is provided or create your own. A good pattern is to start with `api://`. After that, click **"Save"**
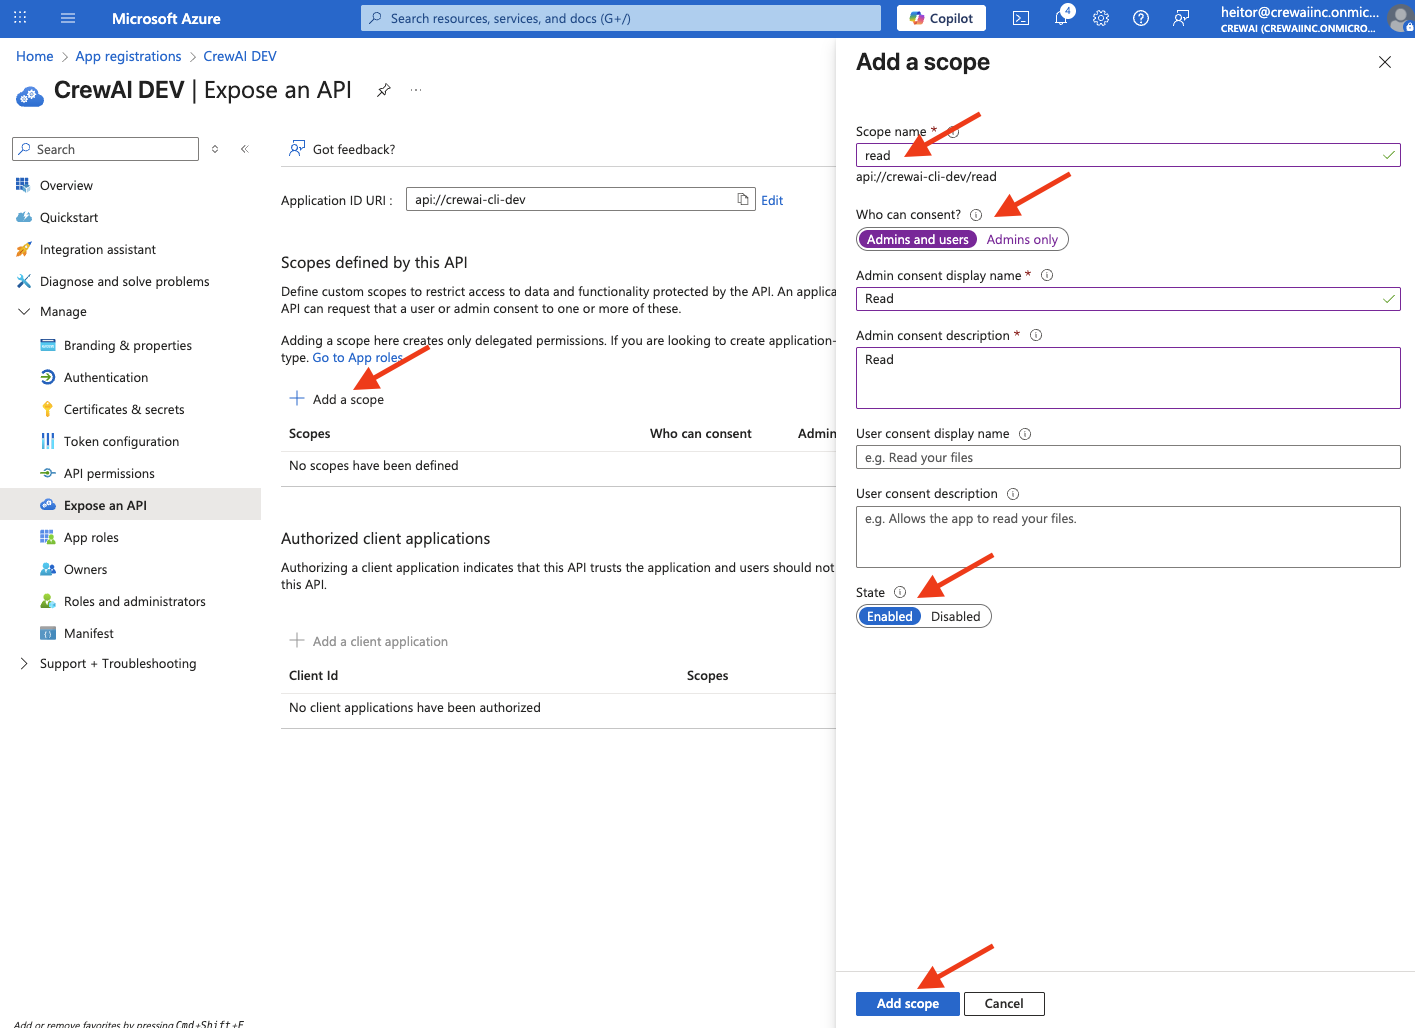
 Now, click **"Add a scope"** within the same page, and choose a name for your scope. We recommend setting it to `read`.
Change the **"Who can consent?"** to **"Admins and users"**, fill whatever is desired on the display name and description fields, ensure the state is **"Enabled"** and then click **"Add scope"**.
Now, click **"Add a scope"** within the same page, and choose a name for your scope. We recommend setting it to `read`.
Change the **"Who can consent?"** to **"Admins and users"**, fill whatever is desired on the display name and description fields, ensure the state is **"Enabled"** and then click **"Add scope"**.
 The created scope should look like this on the **"Expose an API"** page:
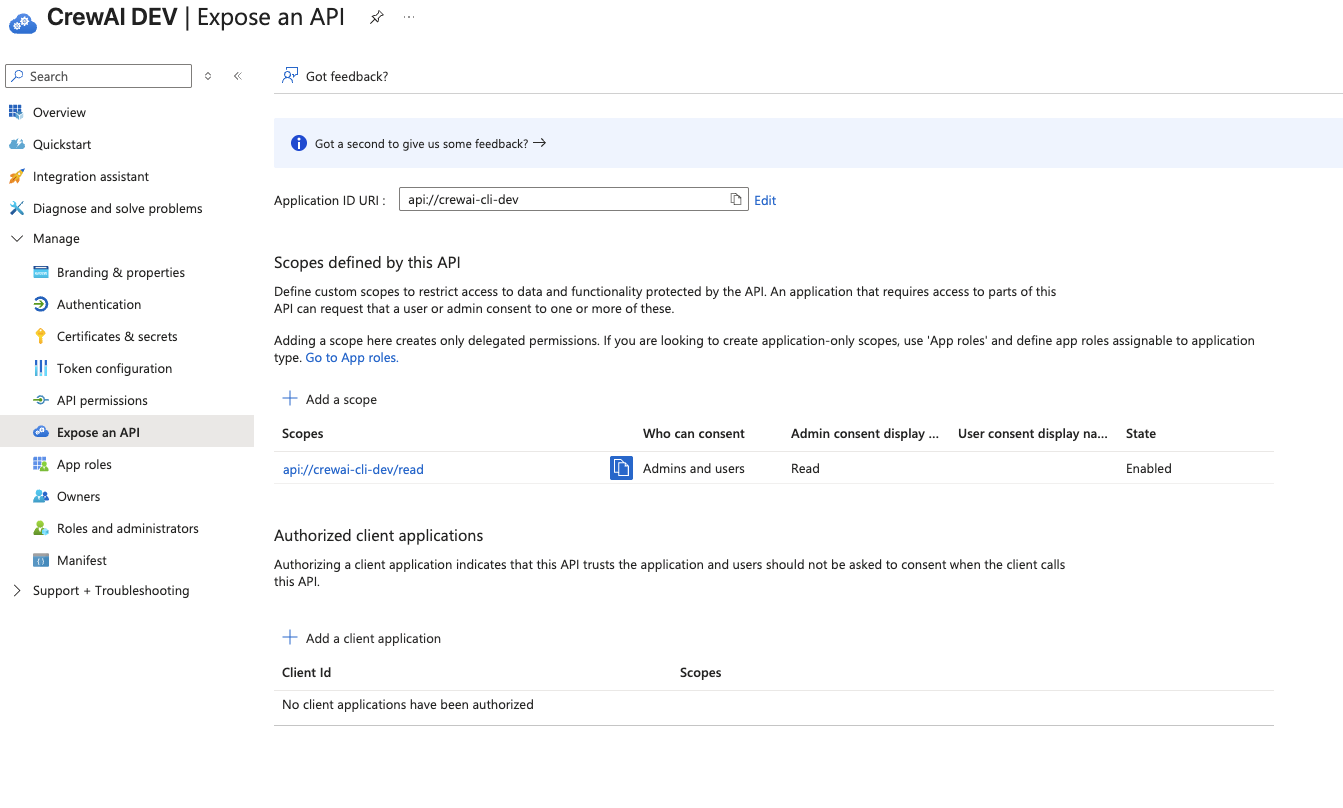 Store the value of this scope (in this case `api://crewai-cli-dev/read`). It will be used earlier in an environment variable on your Factory Installation.
### Update Access Token Version
Now, under **"Management"** on the left sidebar, navigate to **"Manifest"**. Search for the configuration named `accessTokenAcceptedVersion`. The value would likely be `null`, like this:
Store the value of this scope (in this case `api://crewai-cli-dev/read`). It will be used earlier in an environment variable on your Factory Installation.
### Update Access Token Version
Now, under **"Management"** on the left sidebar, navigate to **"Manifest"**. Search for the configuration named `accessTokenAcceptedVersion`. The value would likely be `null`, like this:
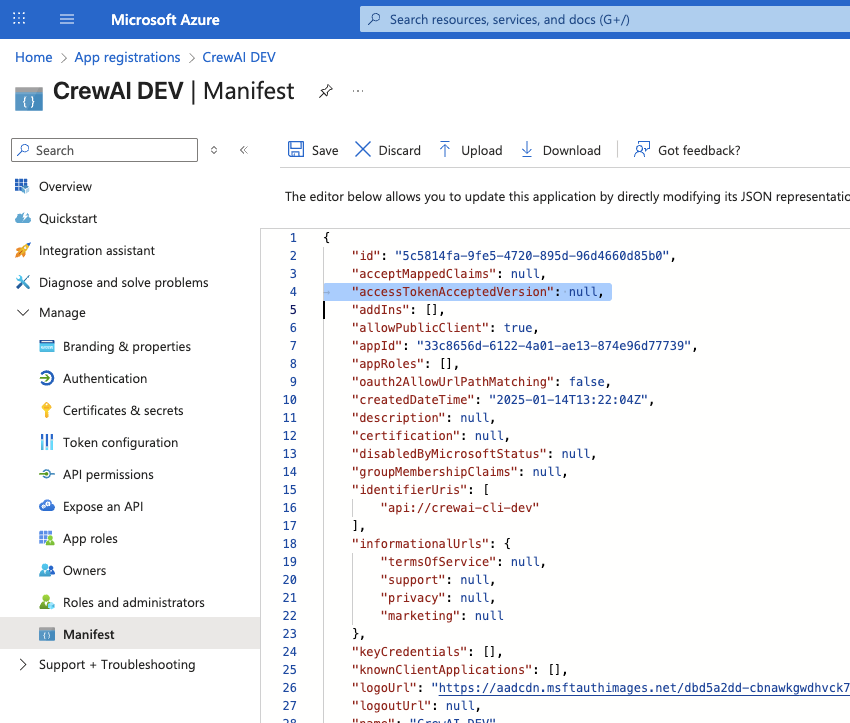 Change the value to `2` and click **"Save"**.
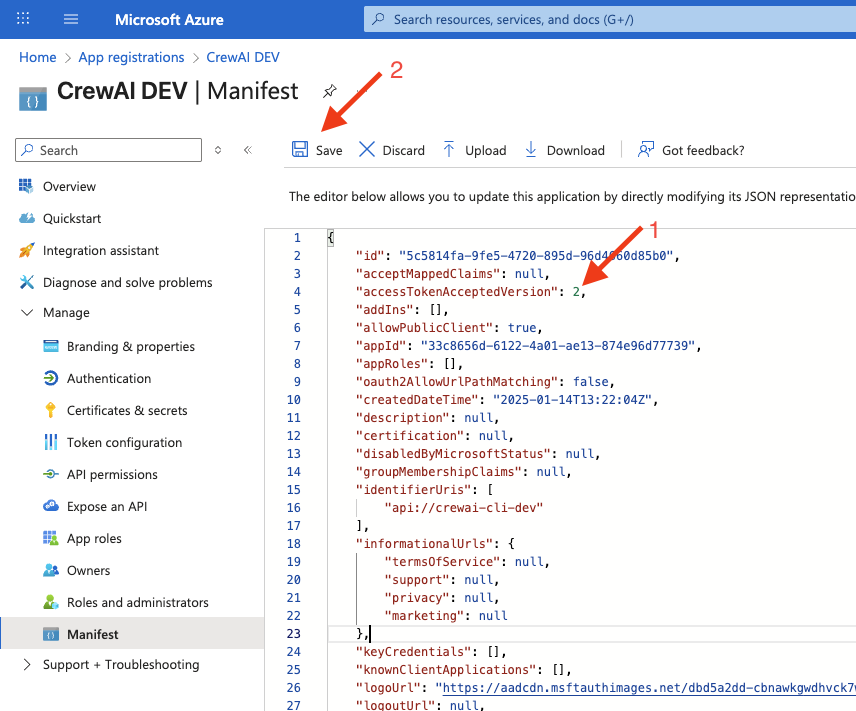 ```json theme={null}
"accessTokenAcceptedVersion": 2
```
### Additional Environment Variables
Now that Entra ID is configured to allow CLI login, we need to add one extra environment variable to our Factory Installation:
```bash theme={null}
# This should have the same value as the client ID provided earlier
ENTRA_ID_DEVICE_AUTHORIZATION_CLIENT_ID="insert the Application (client) ID here"
# This should have the value of the scope you defined on the "Expose an API" page. E.g. 'api://crewai-cli-dev/read'
ENTRA_ID_CUSTOM_OPENID_SCOPE="insert the scope here"
```
## CLI Configuration
Now you are ready to configure your enterprise CLI login.
Make sure your `crewai` CLI is version 1.6.0 or higher. To configure the Entra ID provider just run the following command:
```bash theme={null}
crewai enterprise configure https://your-factory-url.app
```
All set! You're now ready to authenticate using Entra ID!
```bash theme={null}
crewai login
```
```json theme={null}
"accessTokenAcceptedVersion": 2
```
### Additional Environment Variables
Now that Entra ID is configured to allow CLI login, we need to add one extra environment variable to our Factory Installation:
```bash theme={null}
# This should have the same value as the client ID provided earlier
ENTRA_ID_DEVICE_AUTHORIZATION_CLIENT_ID="insert the Application (client) ID here"
# This should have the value of the scope you defined on the "Expose an API" page. E.g. 'api://crewai-cli-dev/read'
ENTRA_ID_CUSTOM_OPENID_SCOPE="insert the scope here"
```
## CLI Configuration
Now you are ready to configure your enterprise CLI login.
Make sure your `crewai` CLI is version 1.6.0 or higher. To configure the Entra ID provider just run the following command:
```bash theme={null}
crewai enterprise configure https://your-factory-url.app
```
All set! You're now ready to authenticate using Entra ID!
```bash theme={null}
crewai login
```