> ## Documentation Index
> Fetch the complete documentation index at: https://enterprise-docs.crewai.com/llms.txt
> Use this file to discover all available pages before exploring further.
# GitHub App Setup and Troubleshooting
> Guide to create a GitHub App for CrewAI Factory integration, along with common troubleshooting steps
## Overview
This guide covers the essential steps to create a GitHub App for CrewAI Factory integration, along with common troubleshooting steps.
CrewAI Factory uses a **[GitHub App](https://docs.github.com/en/apps/creating-github-apps/about-creating-github-apps/about-creating-github-apps)** (not a plain OAuth App) to integrate with GitHub. The GitHub App provides fine-grained repository permissions and uses a private key for server-to-server authentication, while also supporting an OAuth-based user authorization flow during installation.
**GitHub App ≠ OAuth App.** While the installation flow uses OAuth for user authorization, the integration itself is a GitHub App. For more details on the difference, see [GitHub's documentation on app types](https://docs.github.com/en/apps/creating-github-apps/about-creating-github-apps/about-creating-github-apps#github-apps-versus-oauth-apps). For modifying your app after creation, see [Modifying a GitHub App registration](https://docs.github.com/en/apps/maintaining-github-apps/modifying-a-github-app-registration).
## Basic Setup
### 1. Navigate to GitHub App Settings
**Personal Account:**
`https://github.com/settings/apps`
**Organization:**
`https://github.com/organizations/[ORG-NAME]/settings/apps`
Then click **"New GitHub App"**.
### 2. Register New GitHub App
Fill in the required information:
* **GitHub App name:** Choose a descriptive name (e.g., `crewai-factory`)
* **Homepage URL:** `https://www.your-domain-for-crewai.com`
### 3. Configure Authorization Callback
* **Callback URL:** `https://www.your-domain-for-crewai.com/crewai_plus/organizations/github/callback`
* ⚠️ **Critical:** This must match your application's callback endpoint exactly
* ✅ Check **"Request user authorization (OAuth) during installation"**
* ⬜ Leave **"Enable Device Flow"** unchecked unless specifically needed
### 4. Configure Post Installation
* **Setup URL (optional):** `https://www.your-domain-for-crewai.com/users/github/callback`
* ✅ Check **"Redirect on update"**
* This redirects users to the callback URL after installations are updated (e.g., repositories added/removed), ensuring the application stays in sync with permission changes
### 5. Configure Webhook
* ⬜ Uncheck **"Active"** under the Webhook section
* No need to fill in the webhook URL at this stage
* Leave webhook secret empty
### 6. Create the App
Click **"Create GitHub App"** to finish.
## Retrieving Credentials
After creating the app, you'll need to retrieve several credentials:
### App ID
Located at the top of your app's settings page. Note this number — it's required for API authentication.
**Always quote the App ID in your YAML configuration.** GitHub App IDs are numeric, but must be configured as quoted strings (e.g., `"123456"`) to ensure Helm parses them correctly. Unquoted numeric values may cause configuration errors.
### Client ID and Client Secret
1. Navigate to your app's settings page
2. The **Client ID** is displayed on the page
3. Click **"Generate a new client secret"**
4. ⚠️ **Save both immediately** — the client secret is only shown once
### Private Key
1. Scroll to the **"Private keys"** section
2. Click **"Generate a private key"**
3. A `.pem` file will download automatically (e.g., `your-app-name.2026-04-16.private-key.pem`)
4. ⚠️ **Store securely** — you cannot download it again
**The private key is the full PEM file content**, not the fingerprint shown in the GitHub UI.
* ✅ **Correct:** The contents of the downloaded `.pem` file (starts with `-----BEGIN RSA PRIVATE KEY-----`)
* ❌ **Incorrect:** The key fingerprint (a short hex string like `AB:CD:EF:...` displayed on the GitHub settings page)
For more details on generating and managing private keys, see [GitHub's official documentation on managing private keys for GitHub Apps](https://docs.github.com/en/apps/creating-github-apps/authenticating-with-a-github-app/managing-private-keys-for-github-apps).
## Required Permissions
Go to **Permissions and Events** and configure the following:
### Repository Permissions
| Permission | Access Level |
| ---------- | -------------- |
| Contents | Read-only |
| Metadata | Read-only |
| Webhooks | Read and Write |
## Required Environment Variables
Store these credentials in your environment configuration:
These values belong under the top-level `envVars:` and `secrets:` keys in your Helm values file (`my-values.yaml`). See the Configuration Guide for the full values file structure.
```yaml theme={null}
secrets:
GITHUB_CLIENT_SECRET: ""
GITHUB_APP_PRIVATE_KEY: "-----BEGIN RSA PRIVATE KEY-----\nMIIEpAIBAAKCAQEA...\n...\n-----END RSA PRIVATE KEY-----"
envVars:
GITHUB_APP_ID: "123456" # Always quote - numeric App ID must be a string
GITHUB_APP_URL: "/installations/new # Must end with /installations/new"
GITHUB_CLIENT_ID: ""
```
`GITHUB_APP_PRIVATE_KEY` must contain the **entire PEM file content** including the `BEGIN` and `END` markers, formatted as a **single-line string** with literal `\n` characters replacing each line break. Do not paste the key fingerprint (the short hex string from the GitHub UI) — that will not work.
`GITHUB_WEBHOOK_SECRET_TOKEN` is not required for the basic GitHub App integration. Step 5 above instructs you to leave webhooks inactive — you only need this secret if you later activate GitHub webhooks.
### Formatting the Private Key
The private key must be set as a **single-line string** with `\n` replacing each newline. Use the following command to convert your downloaded `.pem` file:
```bash theme={null}
# Validate the key and convert to single-line format
openssl rsa -in /path/to/your-app-name.private-key.pem -check -noout && \
awk 'NF {sub(/\r/, ""); printf "%s\\n", $0}' /path/to/your-app-name.private-key.pem
```
Copy the output and use it as the value for `GITHUB_APP_PRIVATE_KEY`. The result should look like:
```
-----BEGIN RSA PRIVATE KEY-----\nMIIEpAIBAAKCAQEA...\n...\n-----END RSA PRIVATE KEY-----\n
```
**Quick check:** If your value does NOT start with `-----BEGIN RSA PRIVATE KEY-----`, it's not the private key — you may be looking at the fingerprint by mistake.
`GITHUB_APP_URL` must end with `/installations/new`. Using the app homepage URL (`https://github.com/apps/`) appears to work but silently routes users to the wrong page when they click Configure GitHub. The correct format is: `https://github.com/apps//installations/new`
These credentials are required for CrewAI Factory to integrate with GitHub.
## Configuring Repository Access
After installing the GitHub App on your account or organization, you'll need to grant it access to specific repositories.
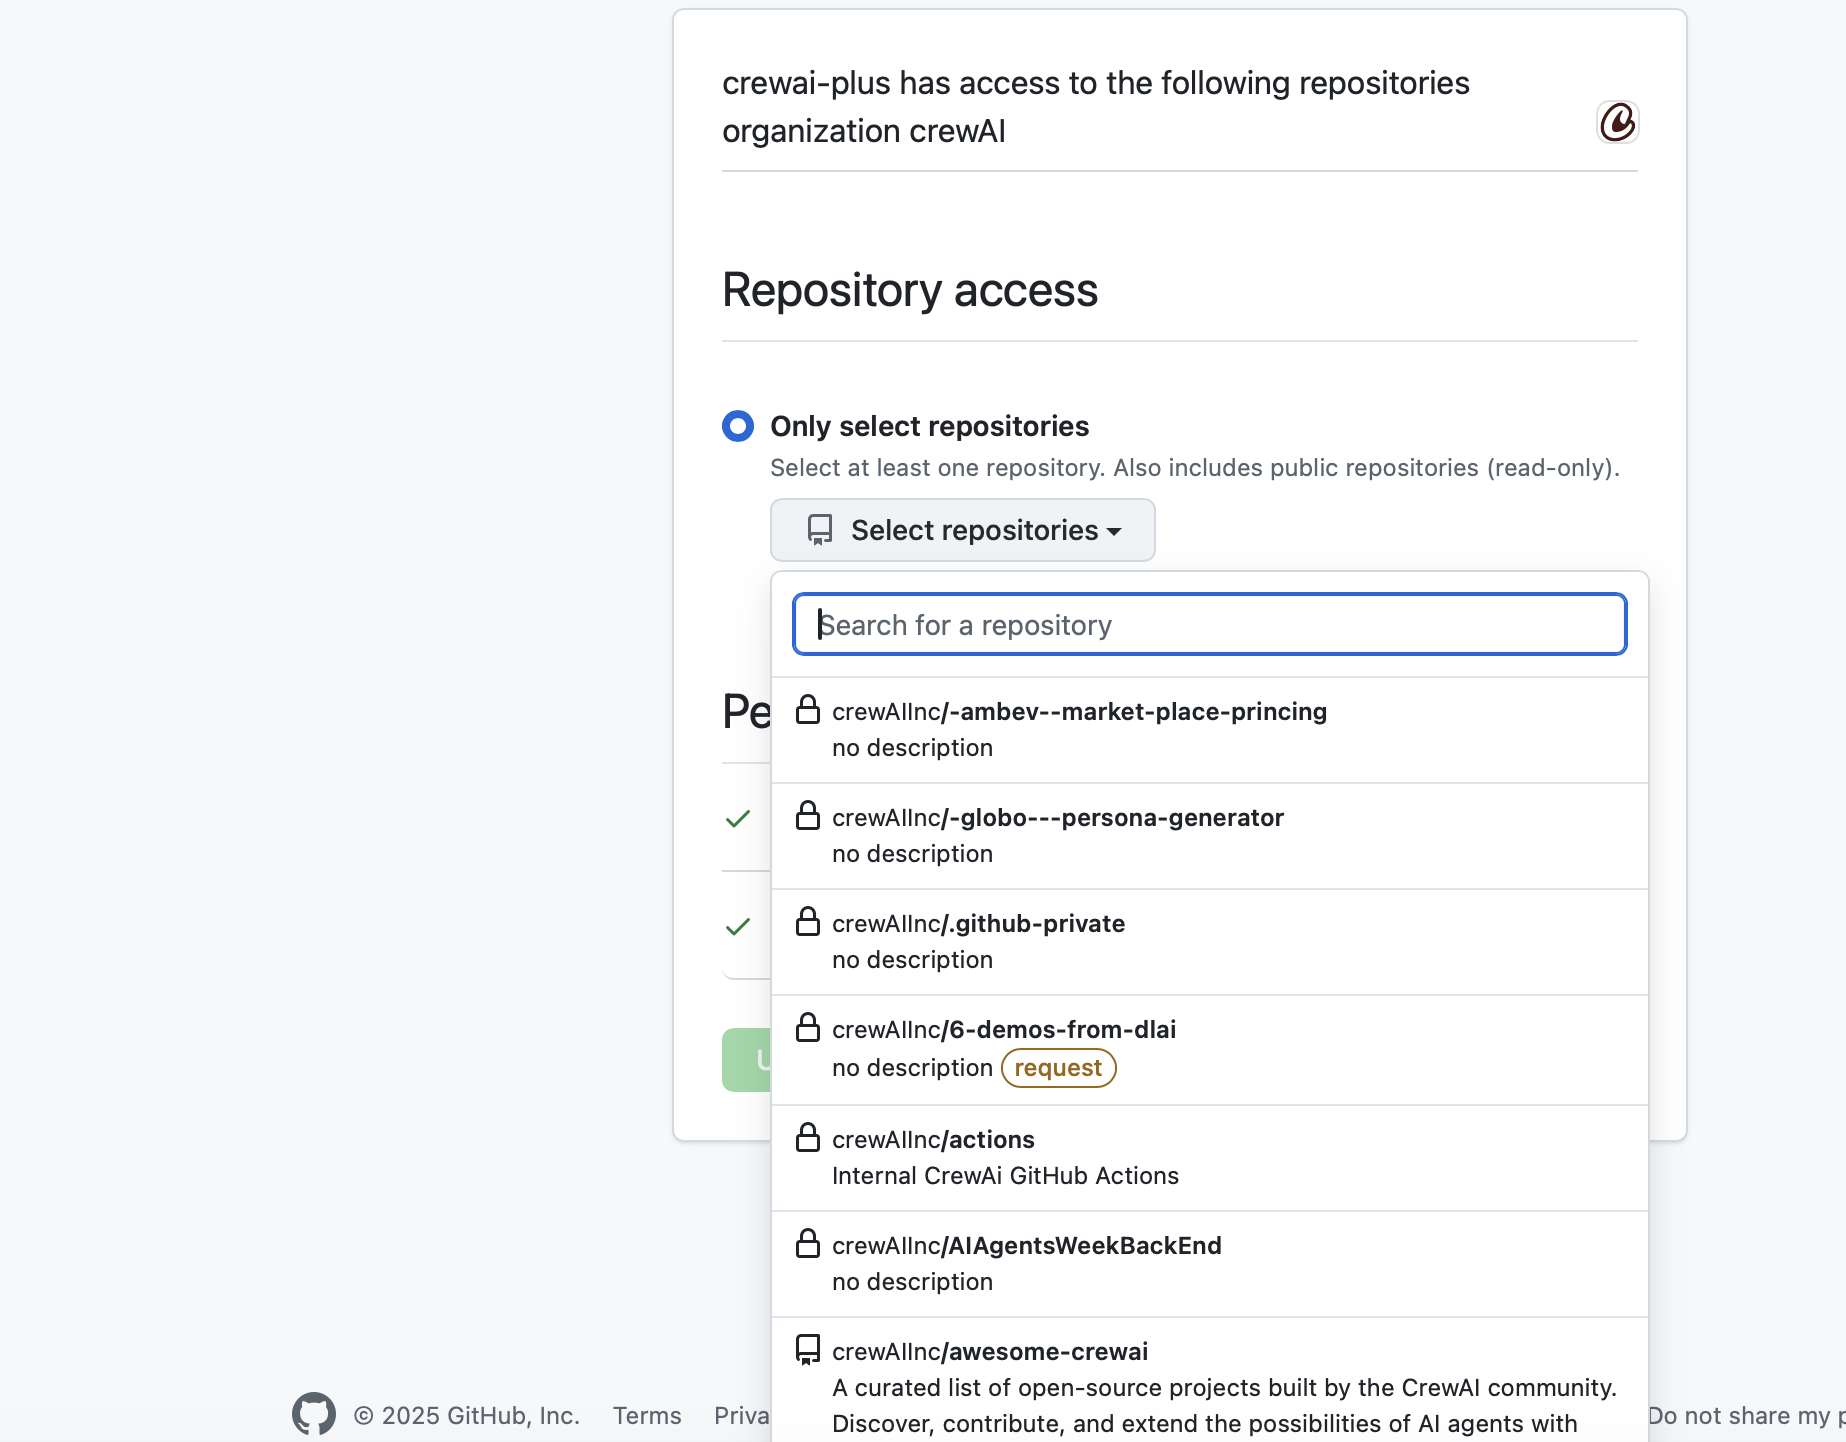
### Option 1: Only Select Repositories (Recommended)
* Select **"Only select repositories"**
* Click **"Select repositories"** dropdown
* Search and select the repositories you want to integrate with CrewAI Factory
* ✅ Repositories will show with a checkmark when selected
* 🔒 Lock icons indicate private repositories
* 🔔 Yellow "request" badges indicate repositories requiring additional approval
 ### Option 2: All Repositories
* Select this only if you need access to all current and future repositories
* ⚠️ **Security consideration:** This grants broad access
## Verifying Installation
After configuration, you should see:
* **"Configure GitHub"** button in your application
* Connection status showing repositories available for deployment
* Message: "Add repositories to your GitHub App installation to deploy from them"
If repositories aren't appearing:
1. Verify the GitHub App is installed on your account/organization
2. Check that repositories are selected in the installation settings
3. Ensure IP whitelist includes your application servers (see Troubleshooting section)
## Troubleshooting
### IP Whitelist Issues
If you encounter authentication connectivity problems, the issue may be related to IP whitelisting.
### Symptoms
* Unable to authenticate with GitHub
* Connection timeouts or refused connections
* OAuth callback failures
* API requests returning 403 Forbidden errors
### Resolution Steps
1. **Check Organization IP Allow List**
* Navigate to your organization settings
* Go to **Settings → Security → IP allow list**
* Verify that your server/application IP addresses are whitelisted
2. **Identify Your Application's IP Address**
```bash theme={null}
# From your server, run:
curl ifconfig.me
```
3. **Add IP to GitHub Allow List**
* In GitHub organization settings, go to **Security**
* Click **"IP allow list"**
* Click **"Add IP allow list entry"**
* Enter your application's IP address or CIDR range
* Add a description (e.g., "CrewAI Factory Production Server")
* Click **"Add"**
4. **Verify the Configuration**
* Test the OAuth flow again
* Check that API calls are succeeding
* Monitor logs for any remaining connection issues
### Common IP Whitelist Scenarios
* **Cloud Deployments:** If using AWS, GCP, or Azure, you may need to whitelist elastic/static IP addresses
* **Load Balancers:** Whitelist the load balancer's outbound IP addresses
* **Multiple Environments:** Ensure dev, staging, and production IPs are all whitelisted
* **Dynamic IPs:** Consider using IP ranges (CIDR notation) or setting up static IPs
### Additional Security Considerations
If your organization has strict IP allow list policies:
* Coordinate with your security team before making changes
* Document all whitelisted IPs and their purposes
* Regularly audit and remove unused IP entries
The GitHub App integration does not require `oauth.enabled: true`. That setting is only for Built-in Integrations (Gmail, Google Calendar, HubSpot, etc.).
## Deploy the Configuration
After collecting all credentials, add them to your Helm values file and apply:
```bash theme={null}
# New installation
helm install crewai-platform oci://registry.crewai.com/crewai/stable/crewai-platform \
--values my-values.yaml
# Existing deployment — upgrade with new GitHub App values
helm upgrade crewai-platform oci://registry.crewai.com/crewai/stable/crewai-platform \
--values my-values.yaml
```
Verify the integration environment variables are set in the web pod:
```bash theme={null}
kubectl exec -it deploy/crewai-web -- env | grep GITHUB
```
After upgrading, verify the integration is active by navigating to **Settings → GitHub** in the CrewAI web UI. You should see the "Configure GitHub" button and be able to install the app on your repositories.
### Option 2: All Repositories
* Select this only if you need access to all current and future repositories
* ⚠️ **Security consideration:** This grants broad access
## Verifying Installation
After configuration, you should see:
* **"Configure GitHub"** button in your application
* Connection status showing repositories available for deployment
* Message: "Add repositories to your GitHub App installation to deploy from them"
If repositories aren't appearing:
1. Verify the GitHub App is installed on your account/organization
2. Check that repositories are selected in the installation settings
3. Ensure IP whitelist includes your application servers (see Troubleshooting section)
## Troubleshooting
### IP Whitelist Issues
If you encounter authentication connectivity problems, the issue may be related to IP whitelisting.
### Symptoms
* Unable to authenticate with GitHub
* Connection timeouts or refused connections
* OAuth callback failures
* API requests returning 403 Forbidden errors
### Resolution Steps
1. **Check Organization IP Allow List**
* Navigate to your organization settings
* Go to **Settings → Security → IP allow list**
* Verify that your server/application IP addresses are whitelisted
2. **Identify Your Application's IP Address**
```bash theme={null}
# From your server, run:
curl ifconfig.me
```
3. **Add IP to GitHub Allow List**
* In GitHub organization settings, go to **Security**
* Click **"IP allow list"**
* Click **"Add IP allow list entry"**
* Enter your application's IP address or CIDR range
* Add a description (e.g., "CrewAI Factory Production Server")
* Click **"Add"**
4. **Verify the Configuration**
* Test the OAuth flow again
* Check that API calls are succeeding
* Monitor logs for any remaining connection issues
### Common IP Whitelist Scenarios
* **Cloud Deployments:** If using AWS, GCP, or Azure, you may need to whitelist elastic/static IP addresses
* **Load Balancers:** Whitelist the load balancer's outbound IP addresses
* **Multiple Environments:** Ensure dev, staging, and production IPs are all whitelisted
* **Dynamic IPs:** Consider using IP ranges (CIDR notation) or setting up static IPs
### Additional Security Considerations
If your organization has strict IP allow list policies:
* Coordinate with your security team before making changes
* Document all whitelisted IPs and their purposes
* Regularly audit and remove unused IP entries
The GitHub App integration does not require `oauth.enabled: true`. That setting is only for Built-in Integrations (Gmail, Google Calendar, HubSpot, etc.).
## Deploy the Configuration
After collecting all credentials, add them to your Helm values file and apply:
```bash theme={null}
# New installation
helm install crewai-platform oci://registry.crewai.com/crewai/stable/crewai-platform \
--values my-values.yaml
# Existing deployment — upgrade with new GitHub App values
helm upgrade crewai-platform oci://registry.crewai.com/crewai/stable/crewai-platform \
--values my-values.yaml
```
Verify the integration environment variables are set in the web pod:
```bash theme={null}
kubectl exec -it deploy/crewai-web -- env | grep GITHUB
```
After upgrading, verify the integration is active by navigating to **Settings → GitHub** in the CrewAI web UI. You should see the "Configure GitHub" button and be able to install the app on your repositories.