> ## Documentation Index
> Fetch the complete documentation index at: https://enterprise-docs.crewai.com/llms.txt
> Use this file to discover all available pages before exploring further.
# Keycloak SSO
> Step-by-step guide to configure Keycloak Single Sign-On for CrewAI Factory
## Overview
This guide walks you through configuring Keycloak as your Single Sign-On (SSO) provider for CrewAI Factory installations.
**Installing for the first time?** The [Deployment Guides](/deployment-guides/overview) provide complete end-to-end walkthroughs with infrastructure setup, full `values.yaml` examples, and post-install steps. Use the closest guide as a base and replace the auth section with this page's Helm values.
## Prerequisites
* A running Keycloak instance (guide based on version **26.4.2**)
* Administrative access to your Keycloak realm
* Your CrewAI Factory installation URL
## Initial Setup
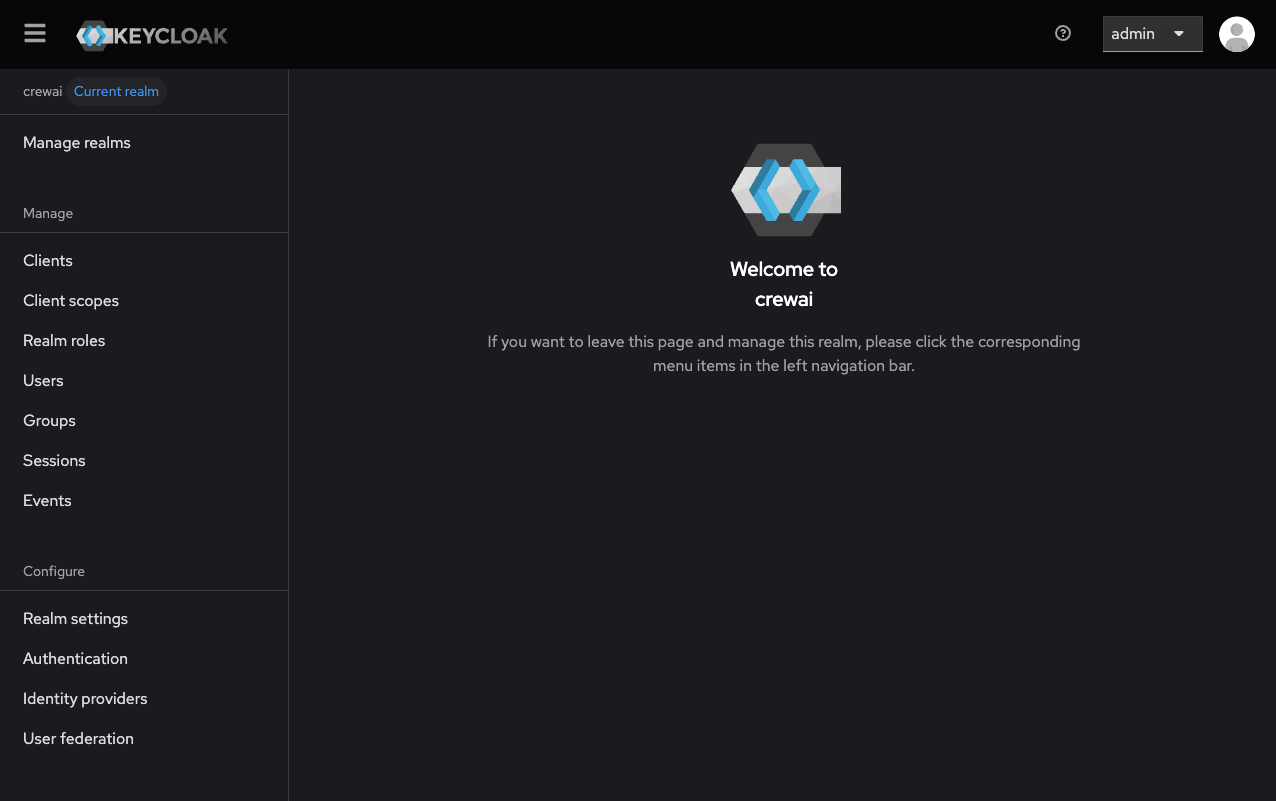
Open your Keycloak admin console. Navigate to your realm (or create a new one if needed).
 ### Creating a Client to log in into the web application (AMP)
In the left sidebar, click **"Clients"**, then click **"Create client"**.
### Creating a Client to log in into the web application (AMP)
In the left sidebar, click **"Clients"**, then click **"Create client"**.
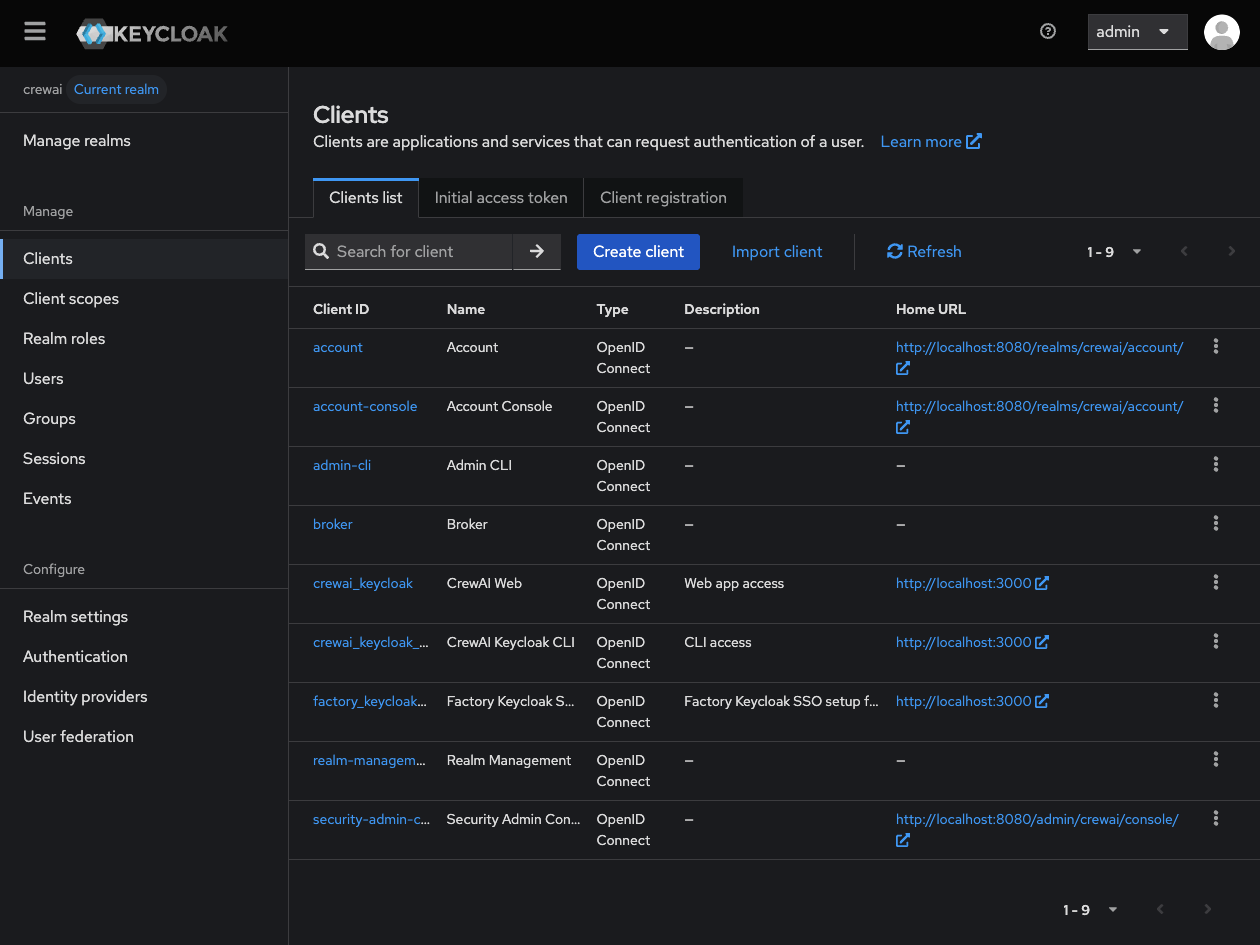 Configure the client with the following settings:
* **Client type:** OpenID Connect
* **Client ID:** Choose a client ID (suggested: `crewai-factory`)
* (Optional): Fill name and description fields.
Click **"Next"** to continue.
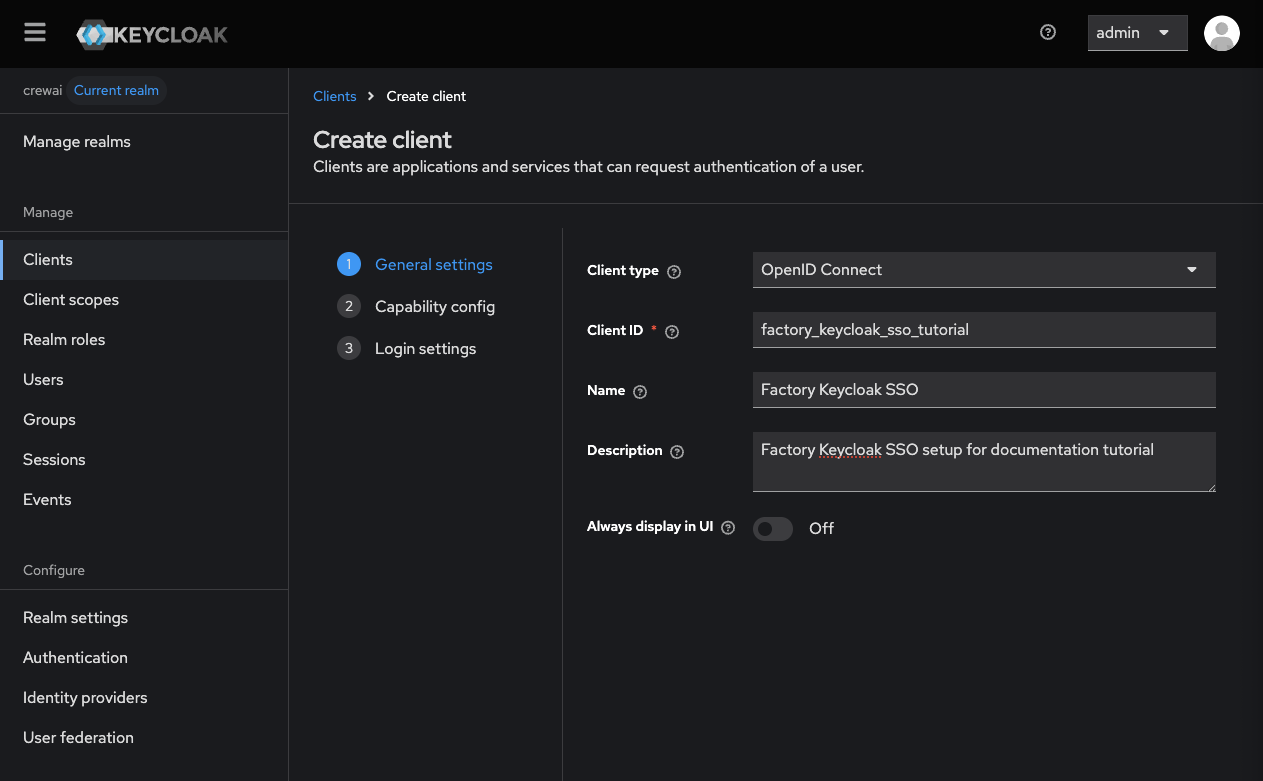
Configure the client with the following settings:
* **Client type:** OpenID Connect
* **Client ID:** Choose a client ID (suggested: `crewai-factory`)
* (Optional): Fill name and description fields.
Click **"Next"** to continue.
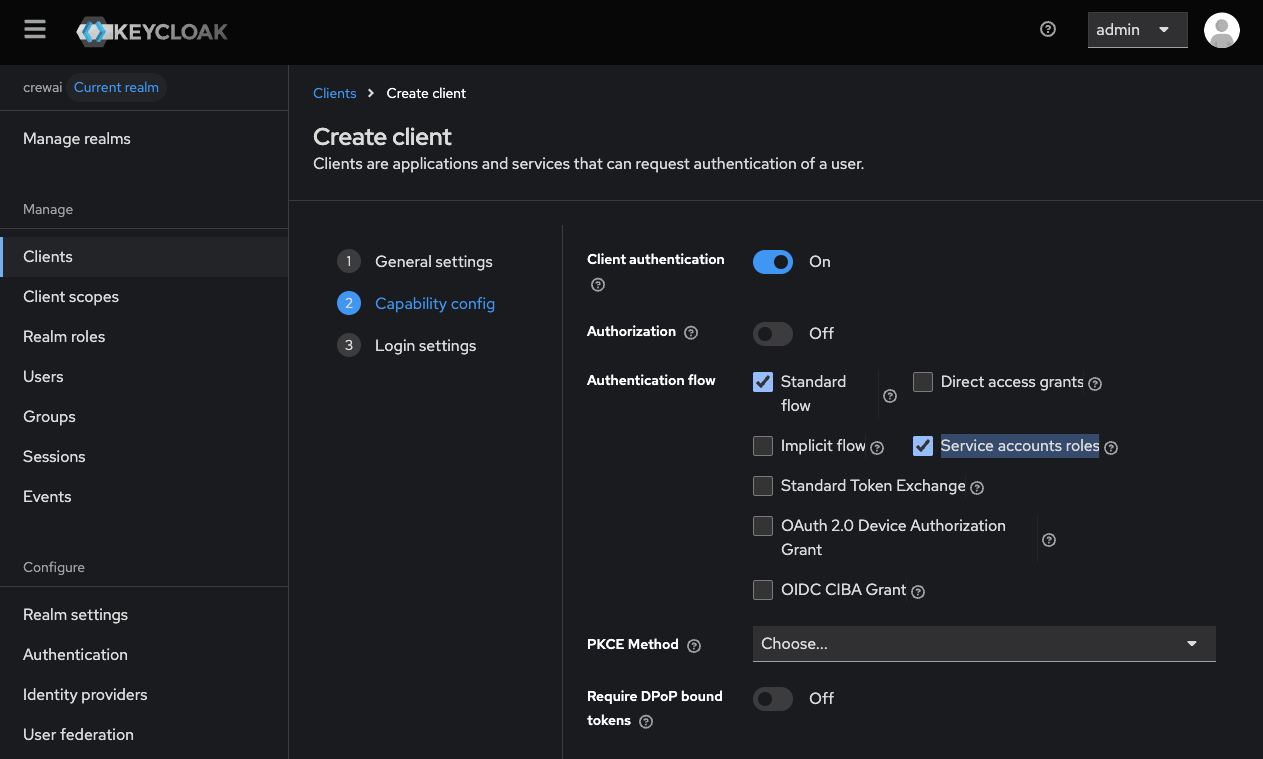
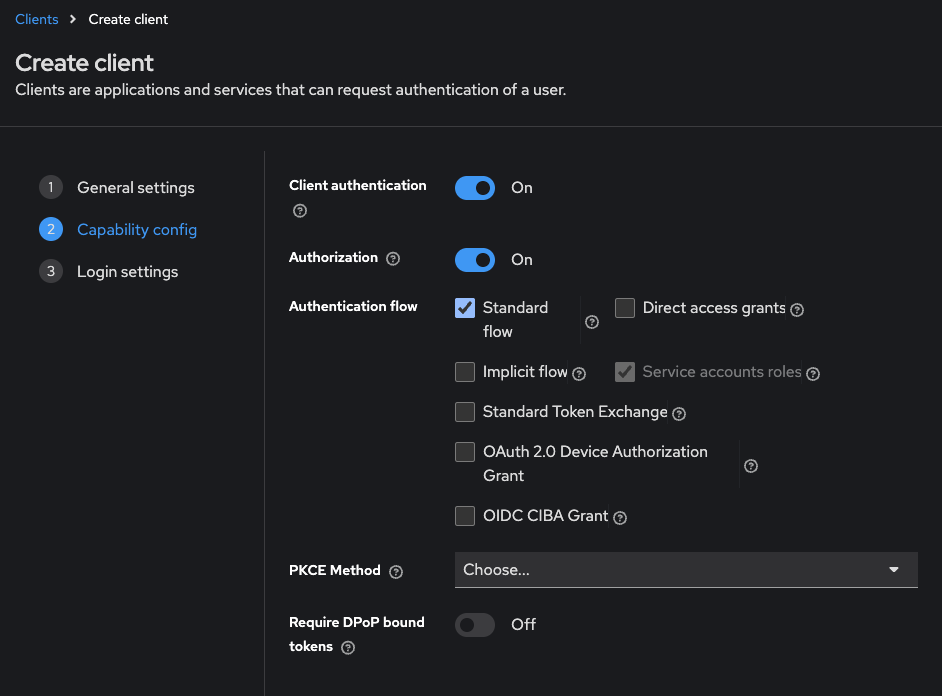
 On the capability configuration screen:
* **Client authentication:** On
* **Authorization:** Off (unless you need fine-grained authorization)
* **Authentication flow:** Check **"Standard flow"** (and **"Service accounts roles"**)
Click **"Next"** to continue.
On the capability configuration screen:
* **Client authentication:** On
* **Authorization:** Off (unless you need fine-grained authorization)
* **Authentication flow:** Check **"Standard flow"** (and **"Service accounts roles"**)
Click **"Next"** to continue.
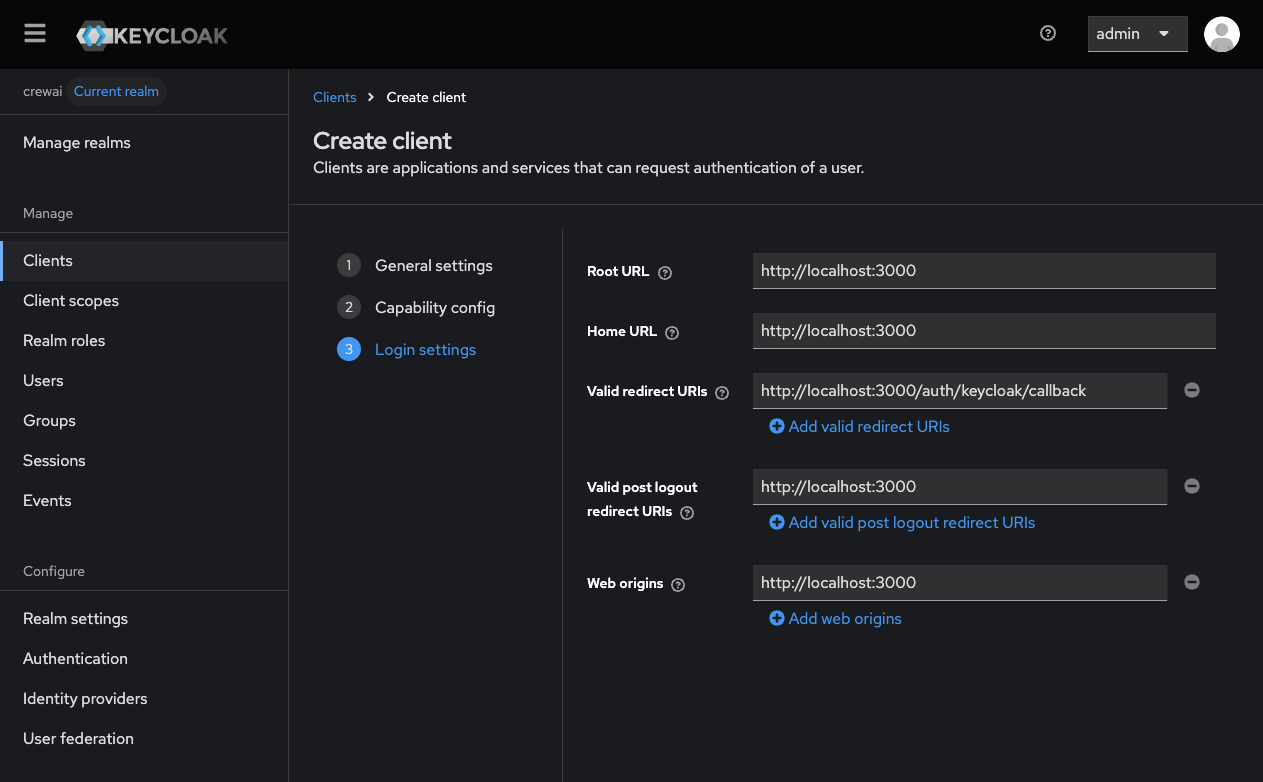
 On the login settings screen:
* **Root URL:** Your CrewAI Factory URL (e.g., `https://myfactoryurl.crewai.com`)
* **Home URL:** Usually the same as the root URL.
* **Valid redirect URIs:** Add your CrewAI Factory URL with the callback path: `https://myfactoryurl.crewai.com/auth/keycloak/callback`
* **Valid post logout redirect URIs:** Your CrewAI Factory URL (e.g., `https://myfactoryurl.crewai.com`)
* **Web origins:** Your CrewAI Factory URL or `+` to allow all redirect URIs
Click **"Save"** to create the client.
On the login settings screen:
* **Root URL:** Your CrewAI Factory URL (e.g., `https://myfactoryurl.crewai.com`)
* **Home URL:** Usually the same as the root URL.
* **Valid redirect URIs:** Add your CrewAI Factory URL with the callback path: `https://myfactoryurl.crewai.com/auth/keycloak/callback`
* **Valid post logout redirect URIs:** Your CrewAI Factory URL (e.g., `https://myfactoryurl.crewai.com`)
* **Web origins:** Your CrewAI Factory URL or `+` to allow all redirect URIs
Click **"Save"** to create the client.
 ## Collecting Credentials
With the client created, collect the necessary credentials for the CrewAI Factory environment variables.
### Client ID and Secret
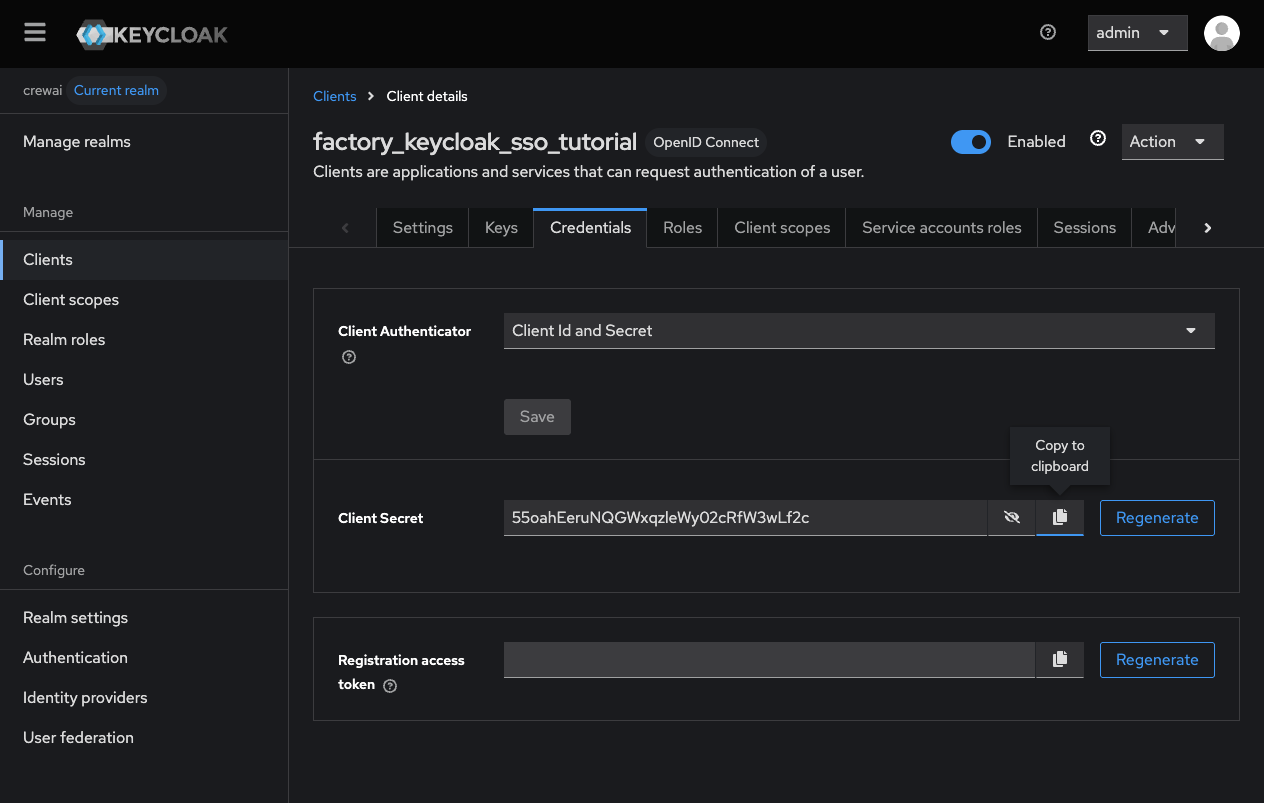
In the client details page:
* **Client ID:** Copy the Client ID you specified during creation. This value should be assigned to the `KEYCLOAK_CLIENT_ID` environment variable.
* *In this tutorial, this value is `factory_keycloak_sso_tutorial`*
* Navigate to the **"Credentials"** tab and copy the **Client secret**. This value should be assigned to the `KEYCLOAK_CLIENT_SECRET` environment variable.
* *In this tutorial, this value is `55oahEeruNQGWxqzleWy02cRfW3wLf2c`*
## Collecting Credentials
With the client created, collect the necessary credentials for the CrewAI Factory environment variables.
### Client ID and Secret
In the client details page:
* **Client ID:** Copy the Client ID you specified during creation. This value should be assigned to the `KEYCLOAK_CLIENT_ID` environment variable.
* *In this tutorial, this value is `factory_keycloak_sso_tutorial`*
* Navigate to the **"Credentials"** tab and copy the **Client secret**. This value should be assigned to the `KEYCLOAK_CLIENT_SECRET` environment variable.
* *In this tutorial, this value is `55oahEeruNQGWxqzleWy02cRfW3wLf2c`*
 ### Realm, Site URL and Base URL
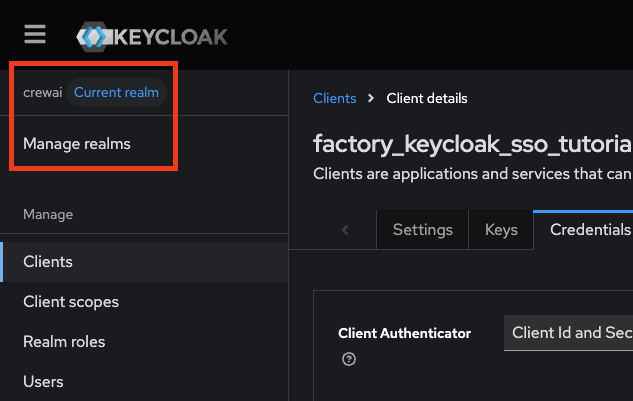
* **Realm name:** Note your realm name. This should be assigned to the `KEYCLOAK_REALM` environment variable.
* *In this tutorial, this value is `crewai`*
* **Site URL:** Your Keycloak server URL (e.g., `https://keycloak.yourdomain.com`). This should be assigned to the `KEYCLOAK_SITE` environment variable.
* *In this tutorial, this value is `http://localhost:8080`*
* **Base URL:** Your Keycloak default context path (e.g. '/auth' or a blank string). This should be assigned to the `KEYCLOAK_BASE_URL` environment variable.
* *In this tutorial, this value will be not set, but you can obtain your base URL as follows:*
* It is the value passed with `--http-relative-path` when you start up your keycloak instance
* After keycloak 17, this is not set, so if you are using Keycloak 17+ without `--http-relative-path`, you do not need to set the environment variable
* If you migrated from 17 to a newer version and you kept the old default `/auth` for example, you should pass `/auth` to keep the backwards compatibility.
**TODO: Add screenshot showing realm name location**
### Realm, Site URL and Base URL
* **Realm name:** Note your realm name. This should be assigned to the `KEYCLOAK_REALM` environment variable.
* *In this tutorial, this value is `crewai`*
* **Site URL:** Your Keycloak server URL (e.g., `https://keycloak.yourdomain.com`). This should be assigned to the `KEYCLOAK_SITE` environment variable.
* *In this tutorial, this value is `http://localhost:8080`*
* **Base URL:** Your Keycloak default context path (e.g. '/auth' or a blank string). This should be assigned to the `KEYCLOAK_BASE_URL` environment variable.
* *In this tutorial, this value will be not set, but you can obtain your base URL as follows:*
* It is the value passed with `--http-relative-path` when you start up your keycloak instance
* After keycloak 17, this is not set, so if you are using Keycloak 17+ without `--http-relative-path`, you do not need to set the environment variable
* If you migrated from 17 to a newer version and you kept the old default `/auth` for example, you should pass `/auth` to keep the backwards compatibility.
**TODO: Add screenshot showing realm name location**
 ## Managing Access
### User Assignment
To control which users can access CrewAI Factory, you can, on step 2 of client creation, activate the "authorization" option.
This will unlock a new "Authorization" tab on Client management where you can configure specific access policies for individual users or groups.
## Managing Access
### User Assignment
To control which users can access CrewAI Factory, you can, on step 2 of client creation, activate the "authorization" option.
This will unlock a new "Authorization" tab on Client management where you can configure specific access policies for individual users or groups.
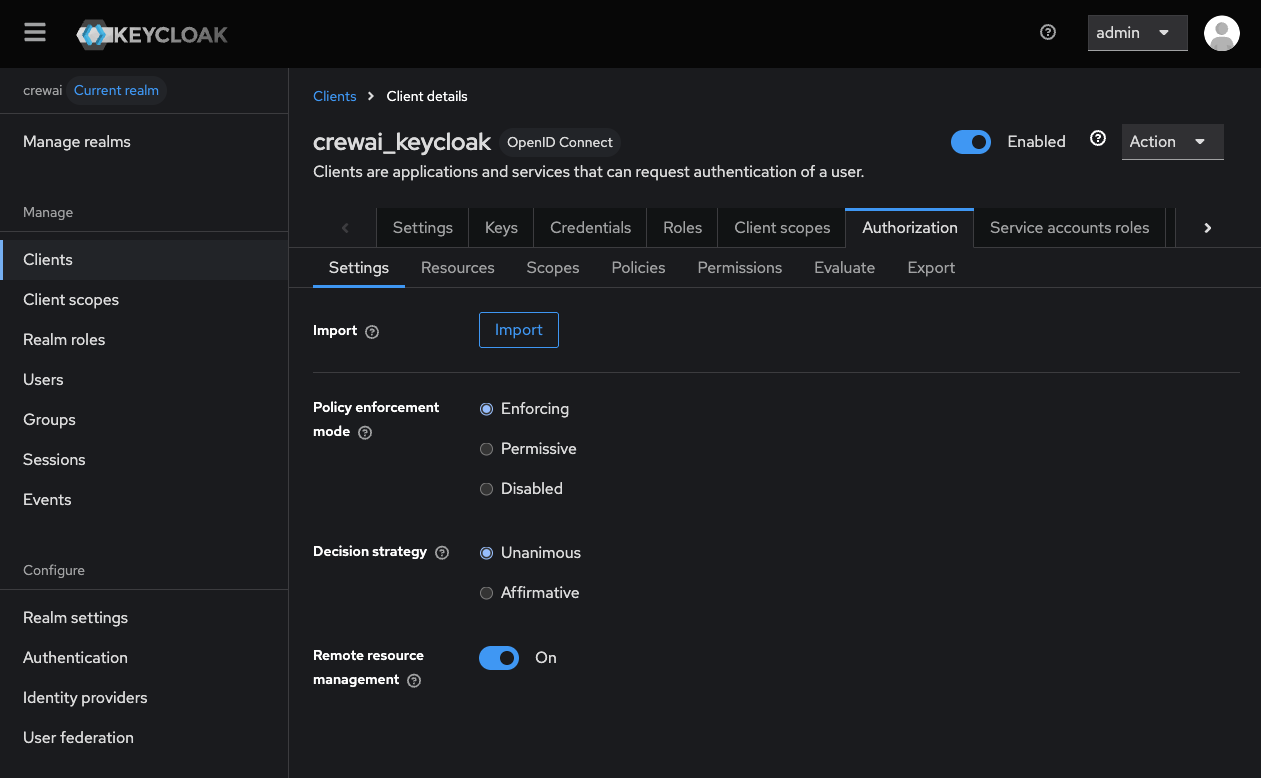 The exact access control configuration depends on your organization's requirements and existing Keycloak setup.
## Environment Variables
With the credentials collected, add the following to your `values.yaml`:
`KEYCLOAK_CLIENT_ID`, `KEYCLOAK_SITE`, `KEYCLOAK_BASE_URL`, `KEYCLOAK_REALM`, and `KEYCLOAK_AUDIENCE` are non-sensitive identifiers that belong under `envVars:`. Only `KEYCLOAK_CLIENT_SECRET` is a credential and belongs under `secrets:`. The chart does not inject Keycloak values from the secrets section into pod environments — values placed under `secrets:` are silently absent from pods.
```yaml theme={null}
envVars:
AUTH_PROVIDER: "keycloak"
KEYCLOAK_CLIENT_ID: "crewai-factory" # Client ID you set during creation
KEYCLOAK_SITE: "https://keycloak.yourdomain.com" # Your Keycloak server URL
KEYCLOAK_BASE_URL: "" # Context path (empty for Keycloak 17+)
KEYCLOAK_REALM: "your-realm-name"
KEYCLOAK_AUDIENCE: "account" # Default; see Configuring the Audience below
secrets:
KEYCLOAK_CLIENT_SECRET: "your-client-secret"
```
## Configuring the Audience
By default, Keycloak includes `account` as the audience (`aud` claim) in access tokens. This is standard Keycloak behavior, and is supported by CrewAI Factory AMP and CLI.
For most installations, you can leave `KEYCLOAK_AUDIENCE=account` and no additional configuration is required. However, if you already use a custom audience or want to configure one, make sure to update `KEYCLOAK_AUDIENCE` accordingly. Below you will find a few resources that explain more about the default value of audience and guides on how to customize it.
### Why is the default audience "account"?
Keycloak automatically adds `account` to the `aud` claim because it represents the built-in account management service. This behavior is documented in various community discussions:
* [Keycloak mailing list discussion on audience claim](https://lists.jboss.org/pipermail/keycloak-user/2018-November/016504.html)
* [Reddit discussion on OIDC access token audience](https://www.reddit.com/r/KeyCloak/comments/1gwxwcz/oidc_access_token_aud_is_account_instead_of_my/)
* [Stack Overflow: How to remove account from aud claim](https://stackoverflow.com/questions/76349018/how-to-remove-account-from-aud-claim-in-keycloak)
### Using a Custom Audience
If your organization requires a custom audience value, you will need to configure it in Keycloak using client scopes and audience mappers. Update the `KEYCLOAK_AUDIENCE` environment variable to match your custom audience value.
Configuring a custom audience requires advanced Keycloak configuration. Ensure your custom audience is properly set up before changing the `KEYCLOAK_AUDIENCE` environment variable, otherwise authentication will fail. Login on CrewAI CLI is *particularly sensitive* to misconfigured audience values.
For instructions on configuring custom audiences in Keycloak, refer to:
* [Keycloak Authorization Services Documentation](https://www.keycloak.org/docs/latest/authorization_services/index.html)
* [How to Configure Audience in Keycloak](https://dev.to/metacosmos/how-to-configure-audience-in-keycloak-kp4)
## Combining With Other Features
* **Wharf (trace collection)**: No additional values needed — Wharf is enabled by default. Ensure the `wharf` database is pre-created. See [Wharf reference](/reference/chart-values/wharf).
* **Studio V2**: Configured entirely post-install via the web UI and `kubectl exec` commands. See [Enable Studio V2](/features/studio-v2).
* **Built-in Integrations**: Requires `oauth.enabled: true` and separate OAuth credentials. See [Built-In Integrations](/features/built-in-integrations-overview).
* **ArgoCD / GitOps**: Auto-generated secrets must be set explicitly. See the [ArgoCD guide](/configuration/argocd).
## Configure the CLI to use Keycloak as your OAuth2 provider
To enable CLI authentication with Keycloak, you need to configure the Device Authorization Grant flow.
### Enable Device Authorization Flow
Navigate to your Keycloak admin console, and refer to the steps below to create a new client that supports the device authorization flow:
### Creating a Client for logging in to the CLI
In the left sidebar, click **"Clients"**, then click **"Create client"**.
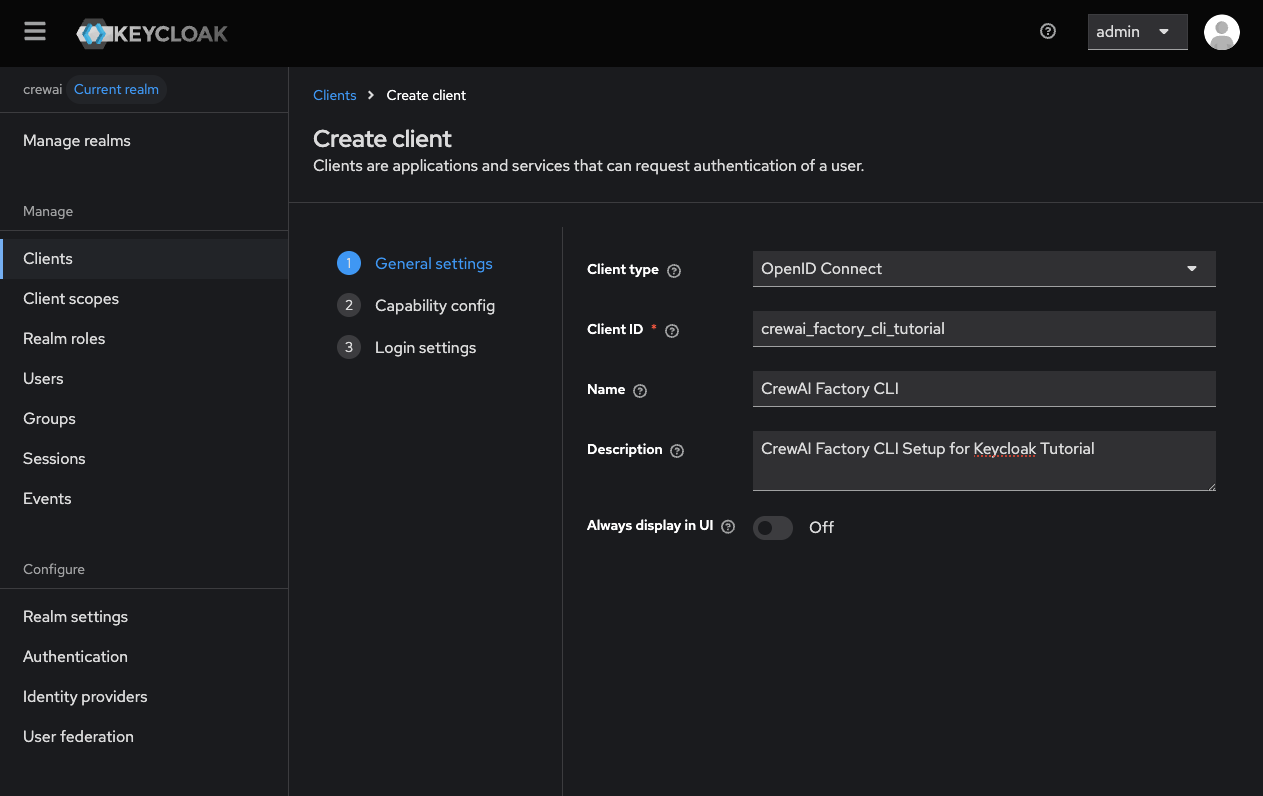
Configure the client with the following settings:
* **Client type:** OpenID Connect
* **Client ID:** Choose a client ID (suggested: `crewai-factory-cli`)
* (Optional): Fill name and description fields.
Click **"Next"** to continue.
The exact access control configuration depends on your organization's requirements and existing Keycloak setup.
## Environment Variables
With the credentials collected, add the following to your `values.yaml`:
`KEYCLOAK_CLIENT_ID`, `KEYCLOAK_SITE`, `KEYCLOAK_BASE_URL`, `KEYCLOAK_REALM`, and `KEYCLOAK_AUDIENCE` are non-sensitive identifiers that belong under `envVars:`. Only `KEYCLOAK_CLIENT_SECRET` is a credential and belongs under `secrets:`. The chart does not inject Keycloak values from the secrets section into pod environments — values placed under `secrets:` are silently absent from pods.
```yaml theme={null}
envVars:
AUTH_PROVIDER: "keycloak"
KEYCLOAK_CLIENT_ID: "crewai-factory" # Client ID you set during creation
KEYCLOAK_SITE: "https://keycloak.yourdomain.com" # Your Keycloak server URL
KEYCLOAK_BASE_URL: "" # Context path (empty for Keycloak 17+)
KEYCLOAK_REALM: "your-realm-name"
KEYCLOAK_AUDIENCE: "account" # Default; see Configuring the Audience below
secrets:
KEYCLOAK_CLIENT_SECRET: "your-client-secret"
```
## Configuring the Audience
By default, Keycloak includes `account` as the audience (`aud` claim) in access tokens. This is standard Keycloak behavior, and is supported by CrewAI Factory AMP and CLI.
For most installations, you can leave `KEYCLOAK_AUDIENCE=account` and no additional configuration is required. However, if you already use a custom audience or want to configure one, make sure to update `KEYCLOAK_AUDIENCE` accordingly. Below you will find a few resources that explain more about the default value of audience and guides on how to customize it.
### Why is the default audience "account"?
Keycloak automatically adds `account` to the `aud` claim because it represents the built-in account management service. This behavior is documented in various community discussions:
* [Keycloak mailing list discussion on audience claim](https://lists.jboss.org/pipermail/keycloak-user/2018-November/016504.html)
* [Reddit discussion on OIDC access token audience](https://www.reddit.com/r/KeyCloak/comments/1gwxwcz/oidc_access_token_aud_is_account_instead_of_my/)
* [Stack Overflow: How to remove account from aud claim](https://stackoverflow.com/questions/76349018/how-to-remove-account-from-aud-claim-in-keycloak)
### Using a Custom Audience
If your organization requires a custom audience value, you will need to configure it in Keycloak using client scopes and audience mappers. Update the `KEYCLOAK_AUDIENCE` environment variable to match your custom audience value.
Configuring a custom audience requires advanced Keycloak configuration. Ensure your custom audience is properly set up before changing the `KEYCLOAK_AUDIENCE` environment variable, otherwise authentication will fail. Login on CrewAI CLI is *particularly sensitive* to misconfigured audience values.
For instructions on configuring custom audiences in Keycloak, refer to:
* [Keycloak Authorization Services Documentation](https://www.keycloak.org/docs/latest/authorization_services/index.html)
* [How to Configure Audience in Keycloak](https://dev.to/metacosmos/how-to-configure-audience-in-keycloak-kp4)
## Combining With Other Features
* **Wharf (trace collection)**: No additional values needed — Wharf is enabled by default. Ensure the `wharf` database is pre-created. See [Wharf reference](/reference/chart-values/wharf).
* **Studio V2**: Configured entirely post-install via the web UI and `kubectl exec` commands. See [Enable Studio V2](/features/studio-v2).
* **Built-in Integrations**: Requires `oauth.enabled: true` and separate OAuth credentials. See [Built-In Integrations](/features/built-in-integrations-overview).
* **ArgoCD / GitOps**: Auto-generated secrets must be set explicitly. See the [ArgoCD guide](/configuration/argocd).
## Configure the CLI to use Keycloak as your OAuth2 provider
To enable CLI authentication with Keycloak, you need to configure the Device Authorization Grant flow.
### Enable Device Authorization Flow
Navigate to your Keycloak admin console, and refer to the steps below to create a new client that supports the device authorization flow:
### Creating a Client for logging in to the CLI
In the left sidebar, click **"Clients"**, then click **"Create client"**.
Configure the client with the following settings:
* **Client type:** OpenID Connect
* **Client ID:** Choose a client ID (suggested: `crewai-factory-cli`)
* (Optional): Fill name and description fields.
Click **"Next"** to continue.
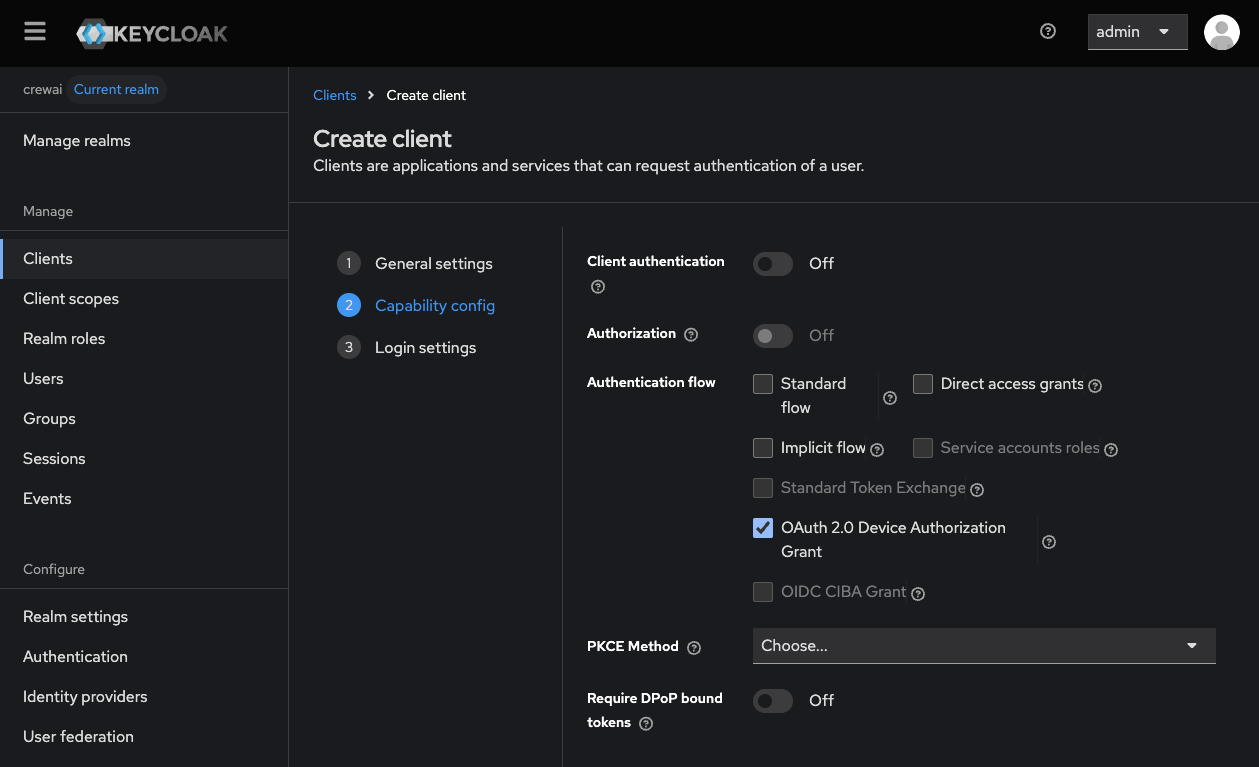
 On the capability configuration screen:
* **Client authentication:** Off
* *(Device authorization grant requires the client to be public)*
* **Authorization:** Off
* **Authentication flow:** Check ONLY **"OAuth 2.0 Device Authorization Grant"**
Click **"Next"** to continue.
On the capability configuration screen:
* **Client authentication:** Off
* *(Device authorization grant requires the client to be public)*
* **Authorization:** Off
* **Authentication flow:** Check ONLY **"OAuth 2.0 Device Authorization Grant"**
Click **"Next"** to continue.
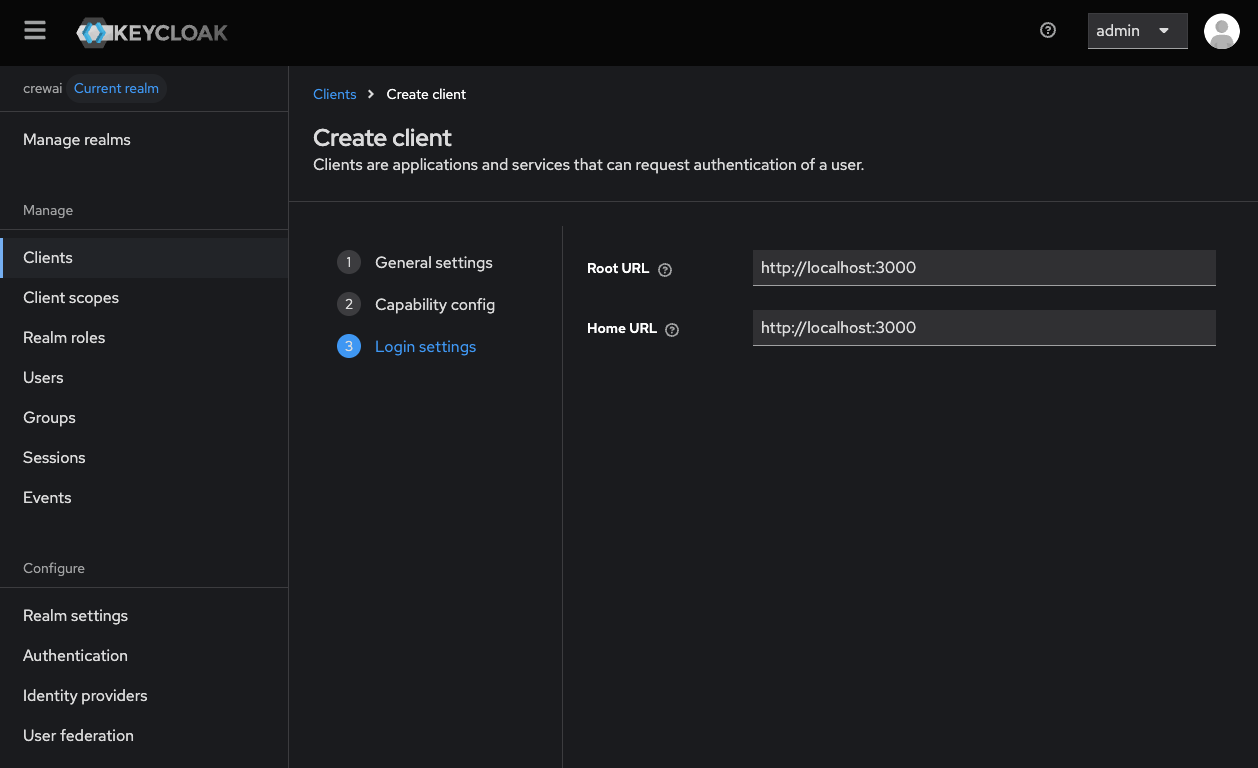
 On the login settings screen:
* **Root URL:** Your CrewAI Factory URL (e.g., `https://myfactoryurl.crewai.com`)
* **Home URL:** Usually the same as the root URL.
Click **"Save"** to create the client.
On the login settings screen:
* **Root URL:** Your CrewAI Factory URL (e.g., `https://myfactoryurl.crewai.com`)
* **Home URL:** Usually the same as the root URL.
Click **"Save"** to create the client.
 ### Additional Environment Variables
Add the following environment variable to your CrewAI Factory installation to enable CLI authentication:
```bash theme={null}
KEYCLOAK_DEVICE_AUTHORIZATION_CLIENT_ID="your-client-id"
```
## CLI Configuration
Now you are ready to configure your enterprise CLI login.
Make sure your `crewai` CLI is version **1.9.0** or higher. To configure the Keycloak provider, run the following command:
```bash theme={null}
crewai enterprise configure https://your-factory-url.app
```
All set! You're now ready to authenticate on CLI using Keycloak:
```bash theme={null}
crewai login
```
### Common Issues
* **Invalid redirect URI:** Ensure the redirect URI in Keycloak exactly matches your Factory URL with `/auth/keycloak/callback`
* **Client authentication failed:** Verify the client secret is correctly copied and the client authentication is enabled
* **User not authorized:** Check that the user has the appropriate roles/group membership to access the application
* **Invalid Audience:** Check that the audience being sent by keycloak is the same one set on `KEYCLOAK_AUDIENCE` environment variable
### Additional Environment Variables
Add the following environment variable to your CrewAI Factory installation to enable CLI authentication:
```bash theme={null}
KEYCLOAK_DEVICE_AUTHORIZATION_CLIENT_ID="your-client-id"
```
## CLI Configuration
Now you are ready to configure your enterprise CLI login.
Make sure your `crewai` CLI is version **1.9.0** or higher. To configure the Keycloak provider, run the following command:
```bash theme={null}
crewai enterprise configure https://your-factory-url.app
```
All set! You're now ready to authenticate on CLI using Keycloak:
```bash theme={null}
crewai login
```
### Common Issues
* **Invalid redirect URI:** Ensure the redirect URI in Keycloak exactly matches your Factory URL with `/auth/keycloak/callback`
* **Client authentication failed:** Verify the client secret is correctly copied and the client authentication is enabled
* **User not authorized:** Check that the user has the appropriate roles/group membership to access the application
* **Invalid Audience:** Check that the audience being sent by keycloak is the same one set on `KEYCLOAK_AUDIENCE` environment variable