> ## Documentation Index
> Fetch the complete documentation index at: https://enterprise-docs.crewai.com/llms.txt
> Use this file to discover all available pages before exploring further.
# Okta SSO
> Step-by-step guide to configure Okta Single Sign-On for CrewAI Factory
## Overview
This guide walks you through configuring Okta as your Single Sign-On (SSO) provider for CrewAI Factory installations.
**Installing for the first time?** The [Deployment Guides](/deployment-guides/overview) provide complete end-to-end walkthroughs with infrastructure setup, full `values.yaml` examples, and post-install steps. Use the closest guide as a base and replace the auth section with this page's Helm values.
## Initial Setup
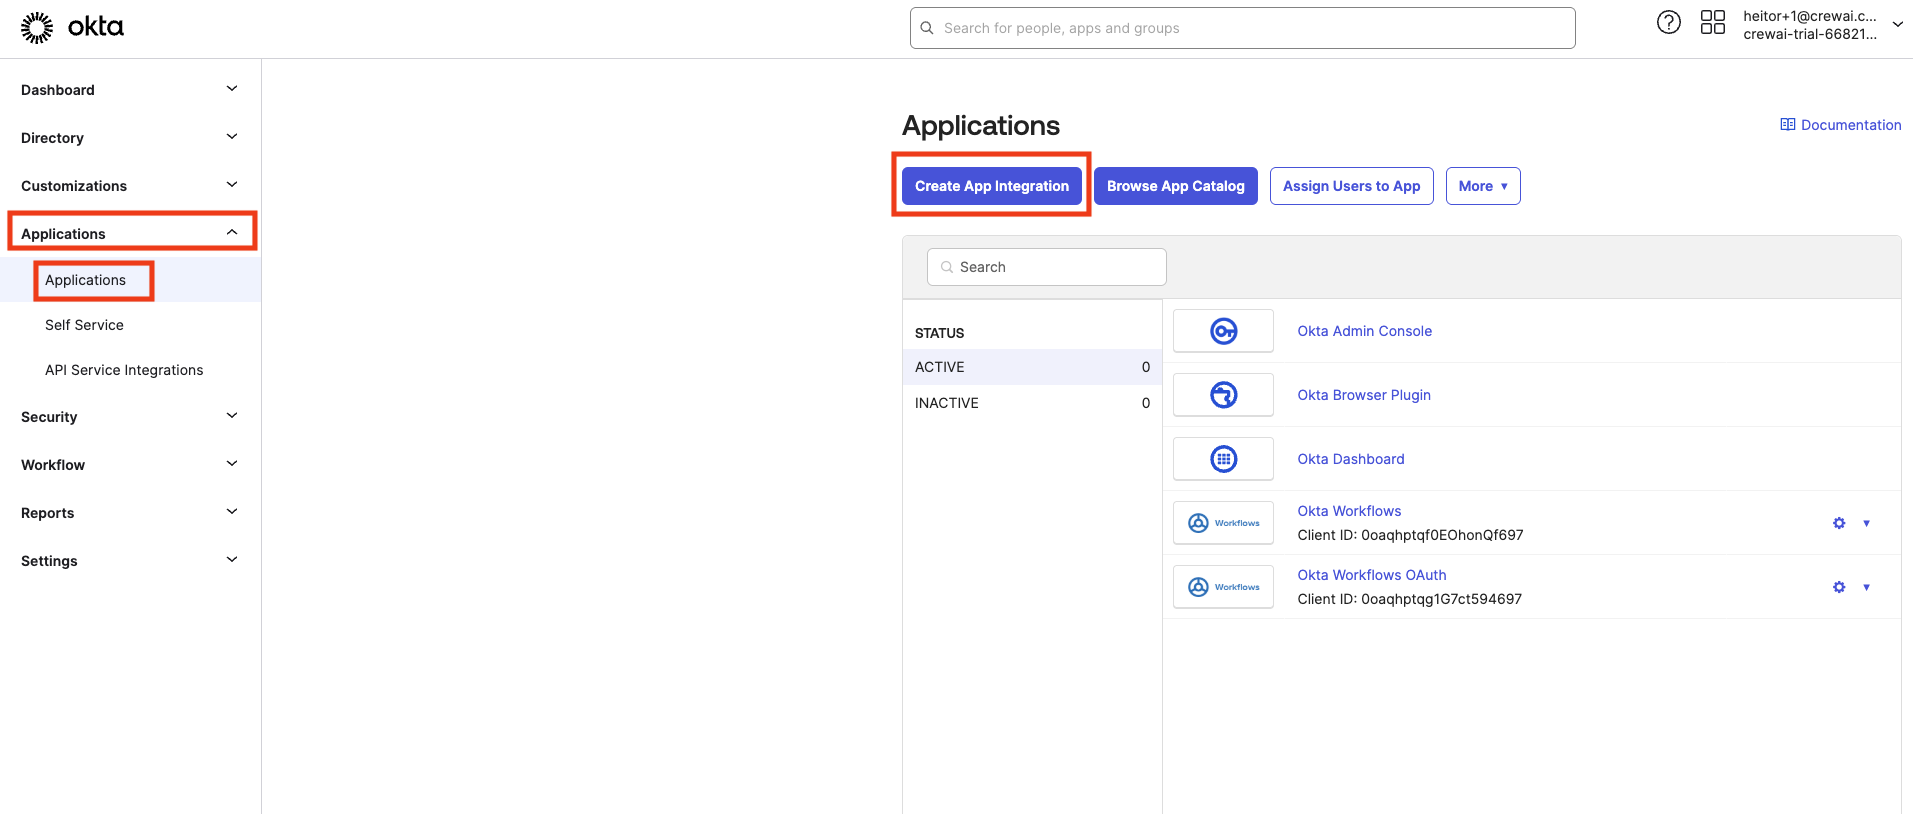
Open your Okta admin panel. Use the left sidebar to navigate to **"Applications"** > **"Applications"**. Then click **"Create App Integration"**.
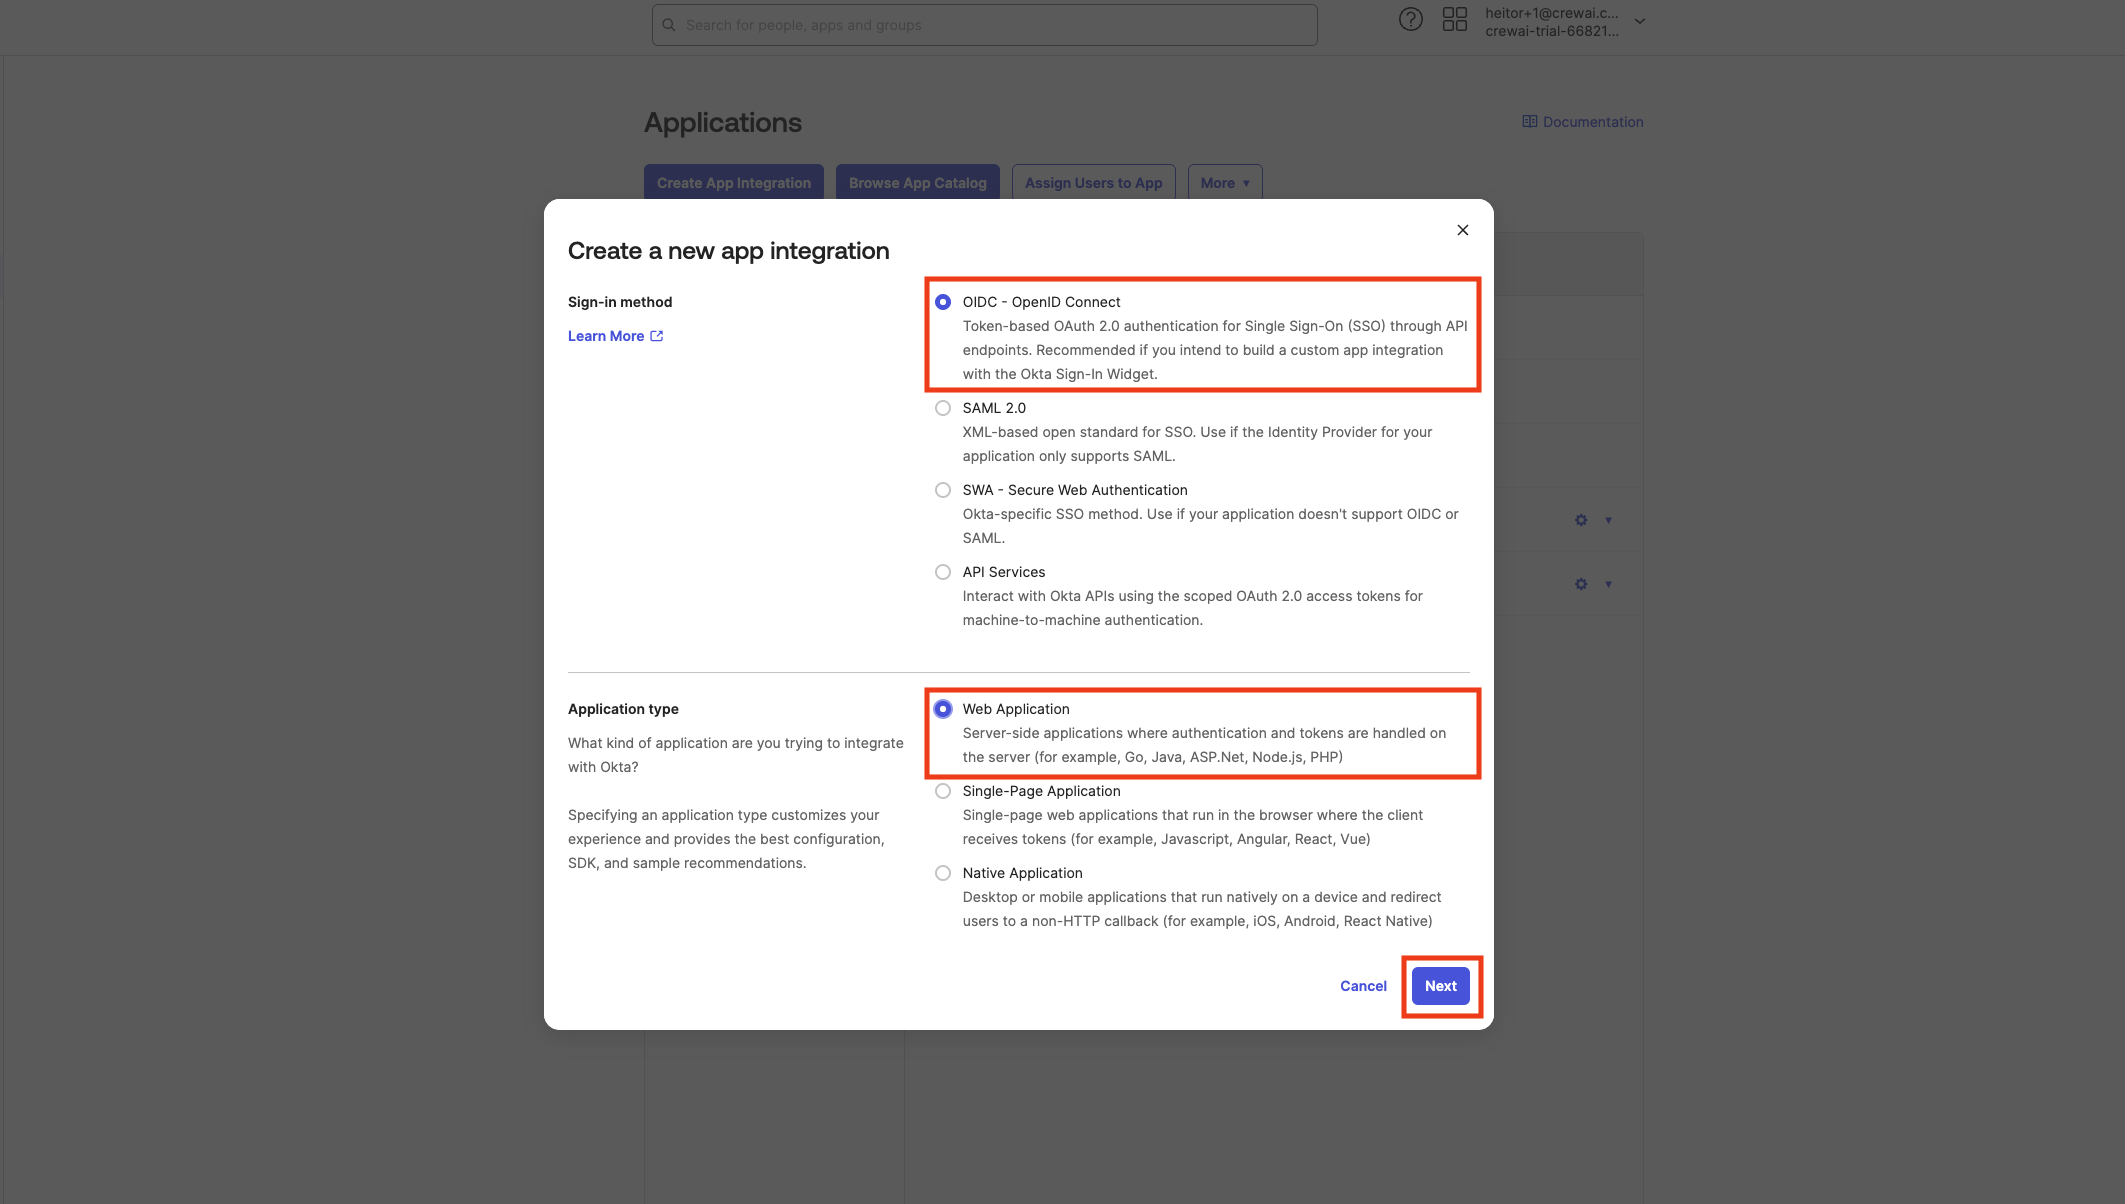
 Choose **"OIDC - OpenID Connect"** and **"Web Application"**. Click Next.
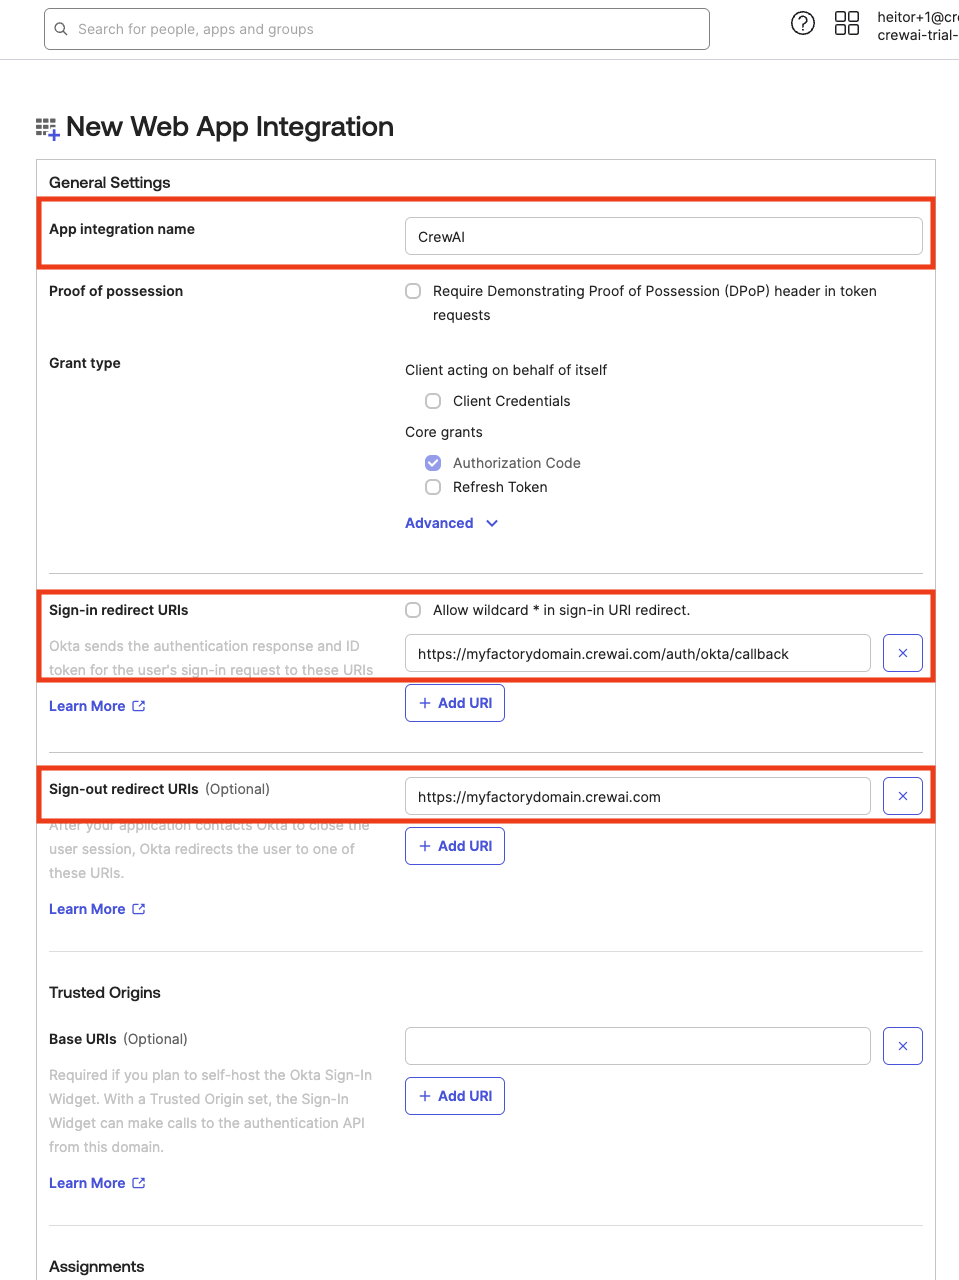
 Give a name for your app (suggested: **CrewAI SSO**). In the sign-in redirect URI, add the URI of your CrewAI Factory installation and add `/auth/okta/callback` at the end (e.g. `https://myfactoryurl.crewai.com/auth/okta/callback`)
For the sign-out URI, just add the plain URI of your CrewAI Factory installation (e.g. `https://myfactoryurl.crewai.com/auth/okta/callback`)
Give a name for your app (suggested: **CrewAI SSO**). In the sign-in redirect URI, add the URI of your CrewAI Factory installation and add `/auth/okta/callback` at the end (e.g. `https://myfactoryurl.crewai.com/auth/okta/callback`)
For the sign-out URI, just add the plain URI of your CrewAI Factory installation (e.g. `https://myfactoryurl.crewai.com/auth/okta/callback`)
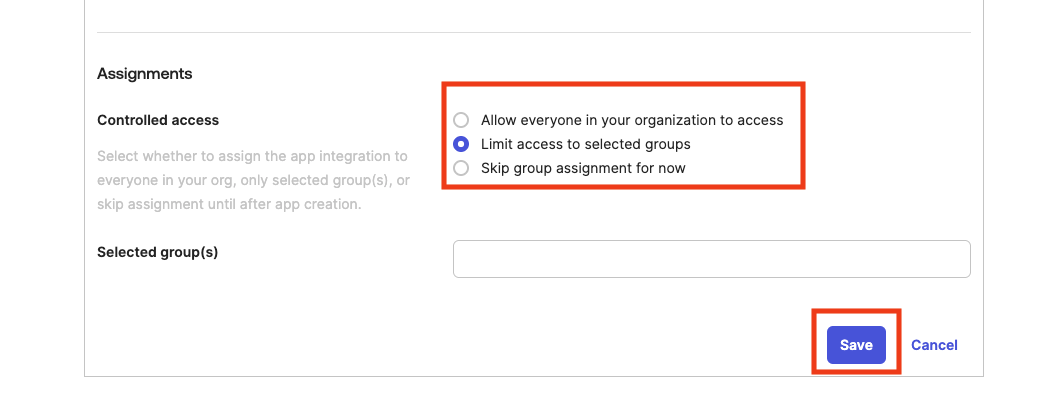
 Under **"Assignments"**, choose the preferred way to control access to the app - everyone or limit access to selected groups. Click **"Save"**.
 ## Collecting Credentials
Now with the app created, we can collect the necessary credentials for the CrewAI Factory application environment variables.
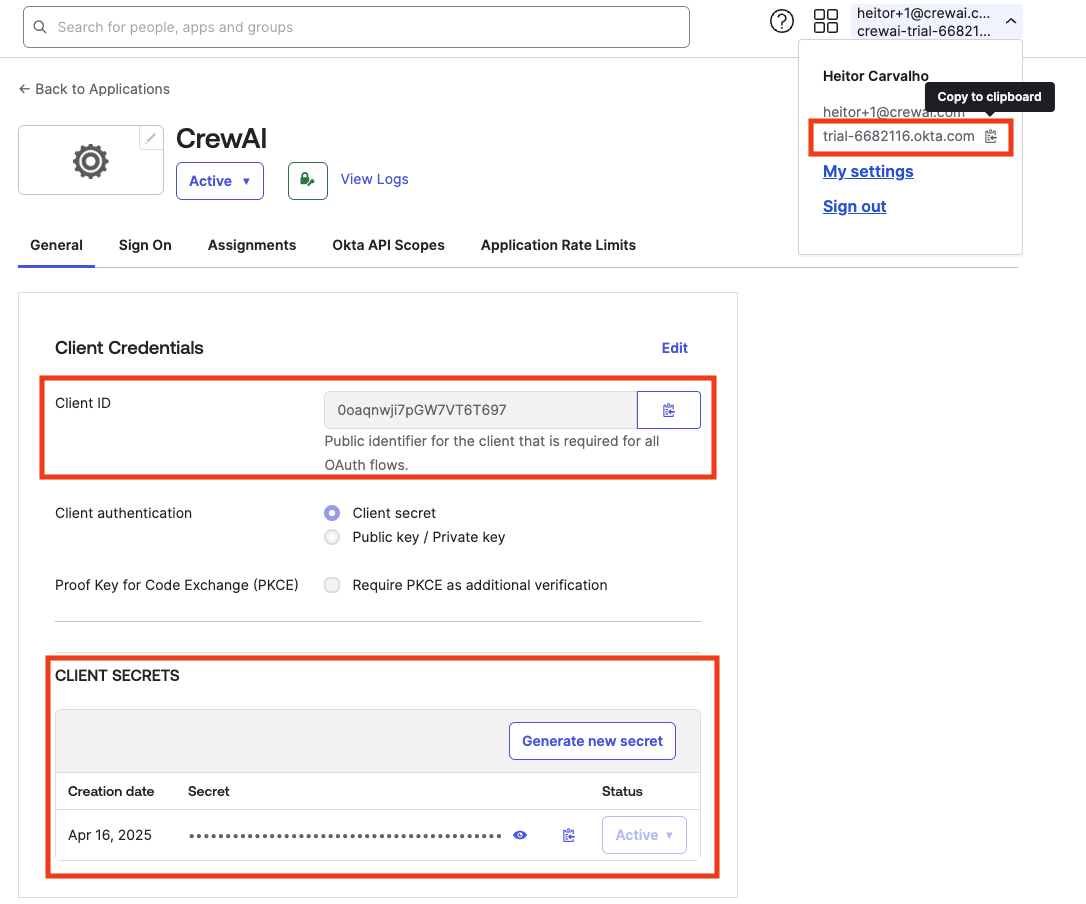
* Under **"Client Credentials"**, copy the Client ID. This value should be assigned to the `OKTA_CLIENT_ID`.
* Under **"Client Secrets"** copy the existing secret or generate a new one. The secret should be assigned to the `OKTA_CLIENT_SECRET` environment variable.
* On the top right corner under your Okta username, you can obtain your unique okta URL. Copy it and assign to the `OKTA_SITE` environment variable.
## Collecting Credentials
Now with the app created, we can collect the necessary credentials for the CrewAI Factory application environment variables.
* Under **"Client Credentials"**, copy the Client ID. This value should be assigned to the `OKTA_CLIENT_ID`.
* Under **"Client Secrets"** copy the existing secret or generate a new one. The secret should be assigned to the `OKTA_CLIENT_SECRET` environment variable.
* On the top right corner under your Okta username, you can obtain your unique okta URL. Copy it and assign to the `OKTA_SITE` environment variable.
 ## Managing Access
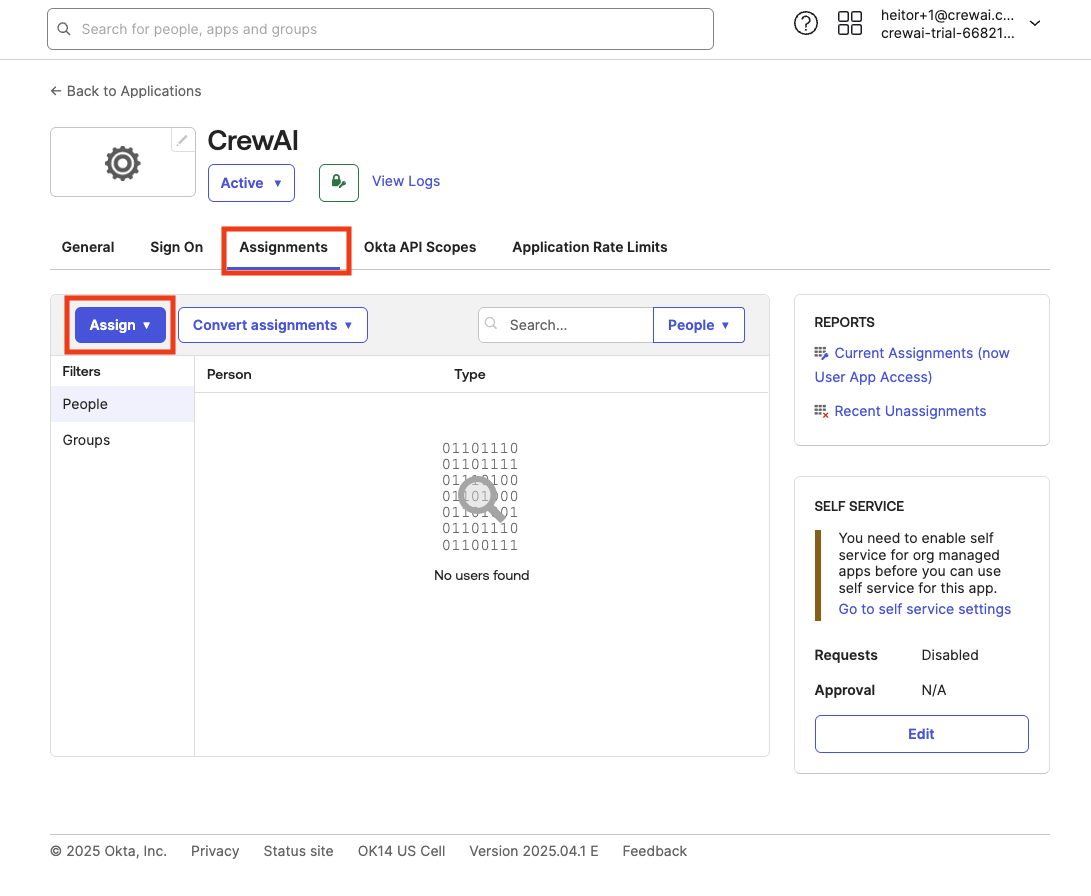
Now, under **"Assignments"** tab, we can manage who has access to this application (if you haven't enabled "Everyone" when creating the app). If you enabled access only to specific people or groups and didn't assign them at app creation time, it is a good moment to do so. Just click **"Assign"**, choose if **"People"** or **"Groups"** and follow the prompts on screen.
## Managing Access
Now, under **"Assignments"** tab, we can manage who has access to this application (if you haven't enabled "Everyone" when creating the app). If you enabled access only to specific people or groups and didn't assign them at app creation time, it is a good moment to do so. Just click **"Assign"**, choose if **"People"** or **"Groups"** and follow the prompts on screen.
 ## Configure Authorization Server
And lastly, we have to configure our authorization server with a policy that allows using our newly created app to login into CrewAI Factory. On the left sidebar, find **"Security"**, and then **"API"**.
## Configure Authorization Server
And lastly, we have to configure our authorization server with a policy that allows using our newly created app to login into CrewAI Factory. On the left sidebar, find **"Security"**, and then **"API"**.
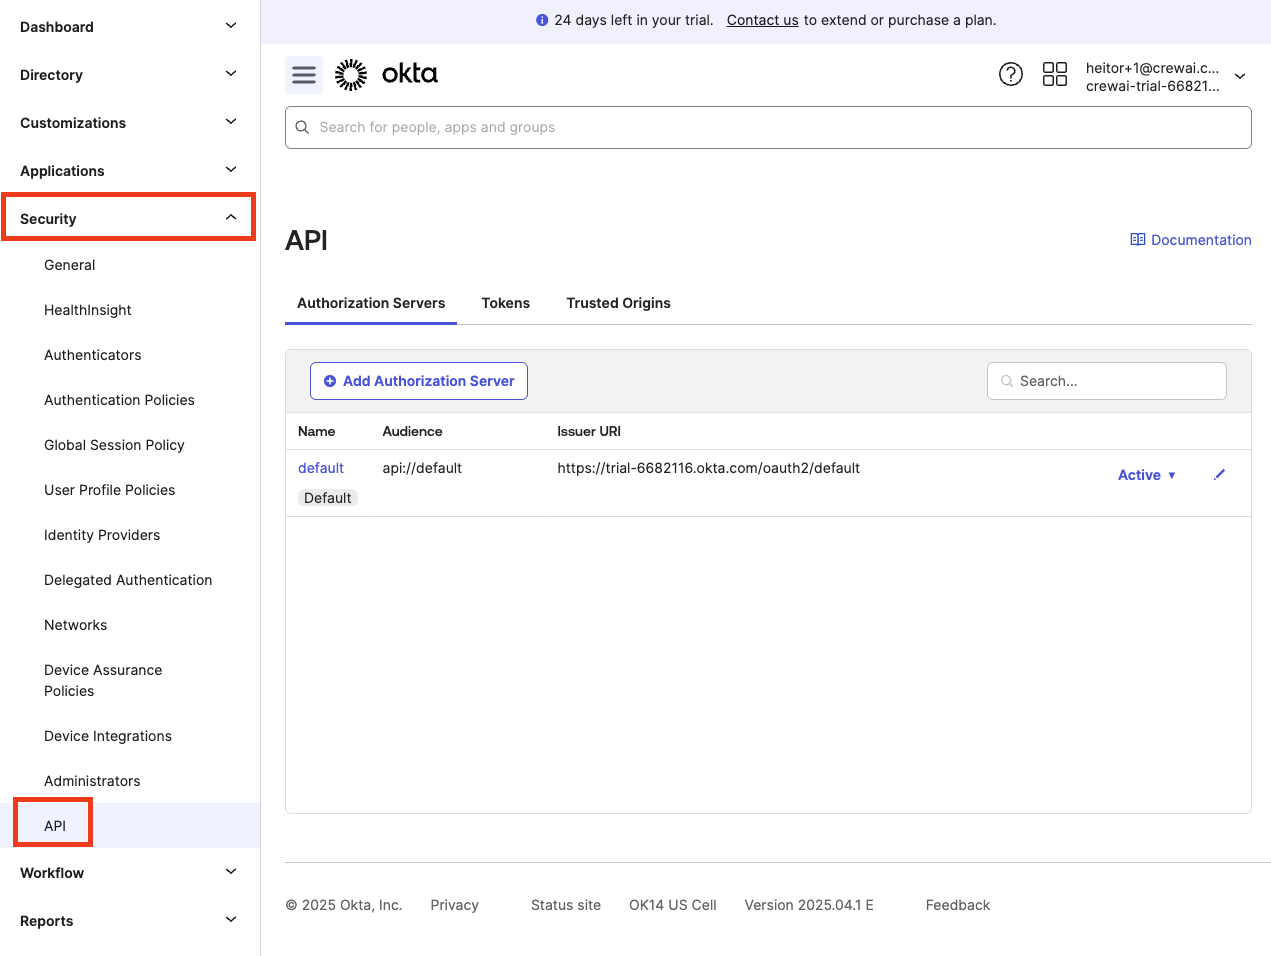 You should have at least one authorization server, named **"default"**. We will use this server for demonstrating the configuration, but you can use another server or create a new one if needed. Just remember that the name of the authorization server that you want to use should be the same as the value of the `OKTA_AUTHORIZATION_SERVER` environment variable. Use the same value value as Audience of the `OKTA_AUDIENCE` environment variable
**NOTE:** If you create a custom authorization server instead of using the `default`, or even if you edit the default one, make sure to update the environment variables `OKTA_AUTHORIZATION_SERVER` and `OKTA_AUDIENCE` with the matching values of "Name" and "Audience" displayed in the authorization servers table listing.
Failure to do so will likely result in `"401 Client Error: Unauthorized for url"` or `"Invalid token: Signature verification failed"` errors when trying to authenticate with the CrewAI CLI tool.
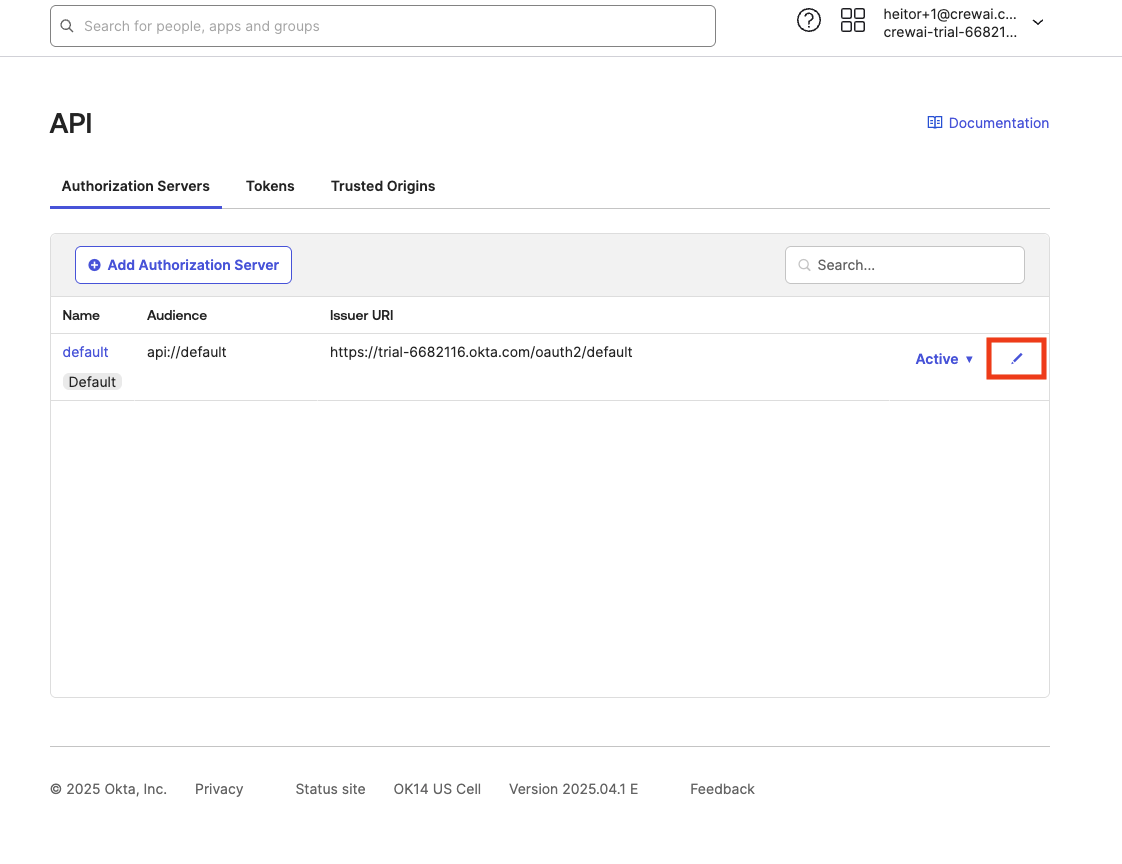
Click on **"Edit"** icon in the server that you will use as your authorization server.
You should have at least one authorization server, named **"default"**. We will use this server for demonstrating the configuration, but you can use another server or create a new one if needed. Just remember that the name of the authorization server that you want to use should be the same as the value of the `OKTA_AUTHORIZATION_SERVER` environment variable. Use the same value value as Audience of the `OKTA_AUDIENCE` environment variable
**NOTE:** If you create a custom authorization server instead of using the `default`, or even if you edit the default one, make sure to update the environment variables `OKTA_AUTHORIZATION_SERVER` and `OKTA_AUDIENCE` with the matching values of "Name" and "Audience" displayed in the authorization servers table listing.
Failure to do so will likely result in `"401 Client Error: Unauthorized for url"` or `"Invalid token: Signature verification failed"` errors when trying to authenticate with the CrewAI CLI tool.
Click on **"Edit"** icon in the server that you will use as your authorization server.
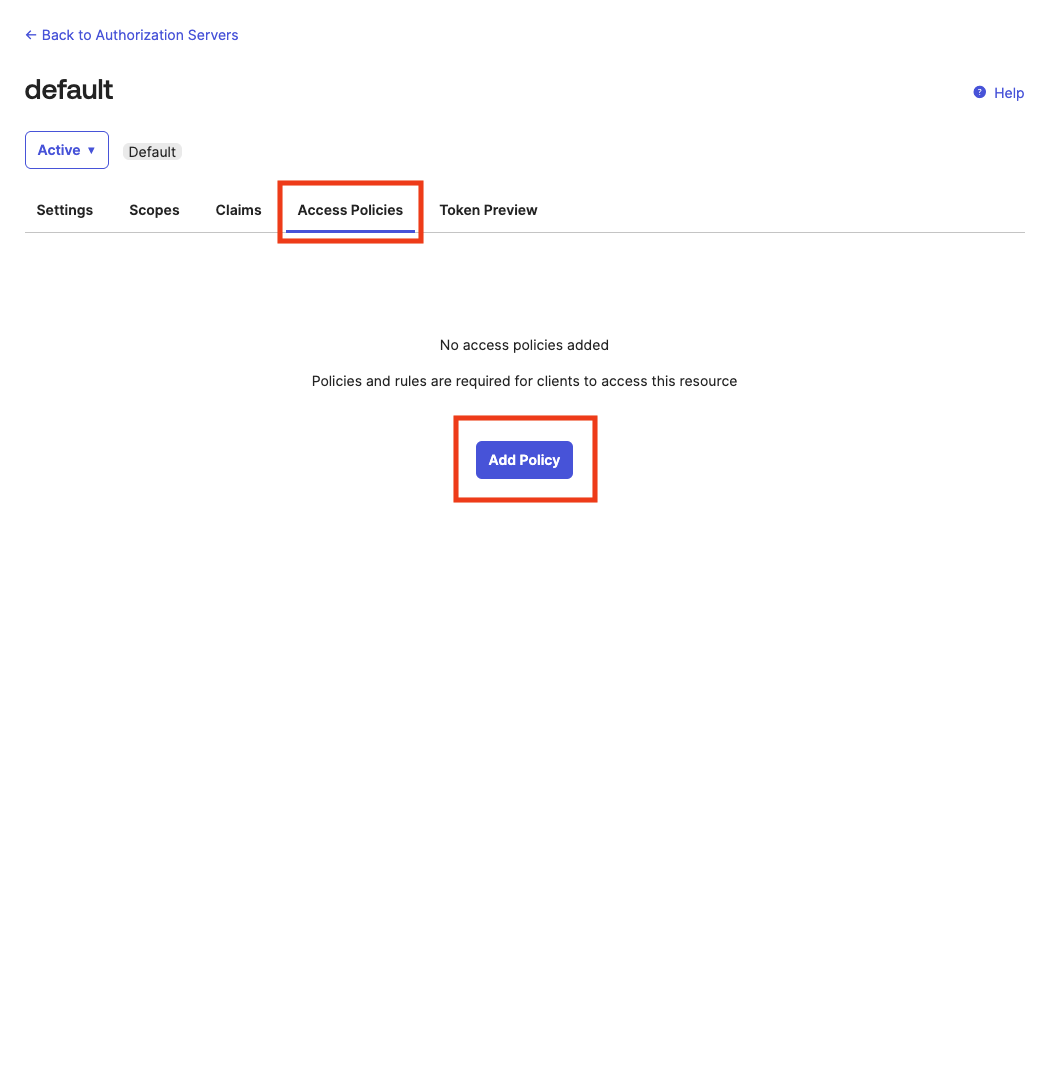
 Under the **"Access Policies"** tab, click **"Add Policy"**, or, if you have existing Policies, **"Add New Access Policy"**.
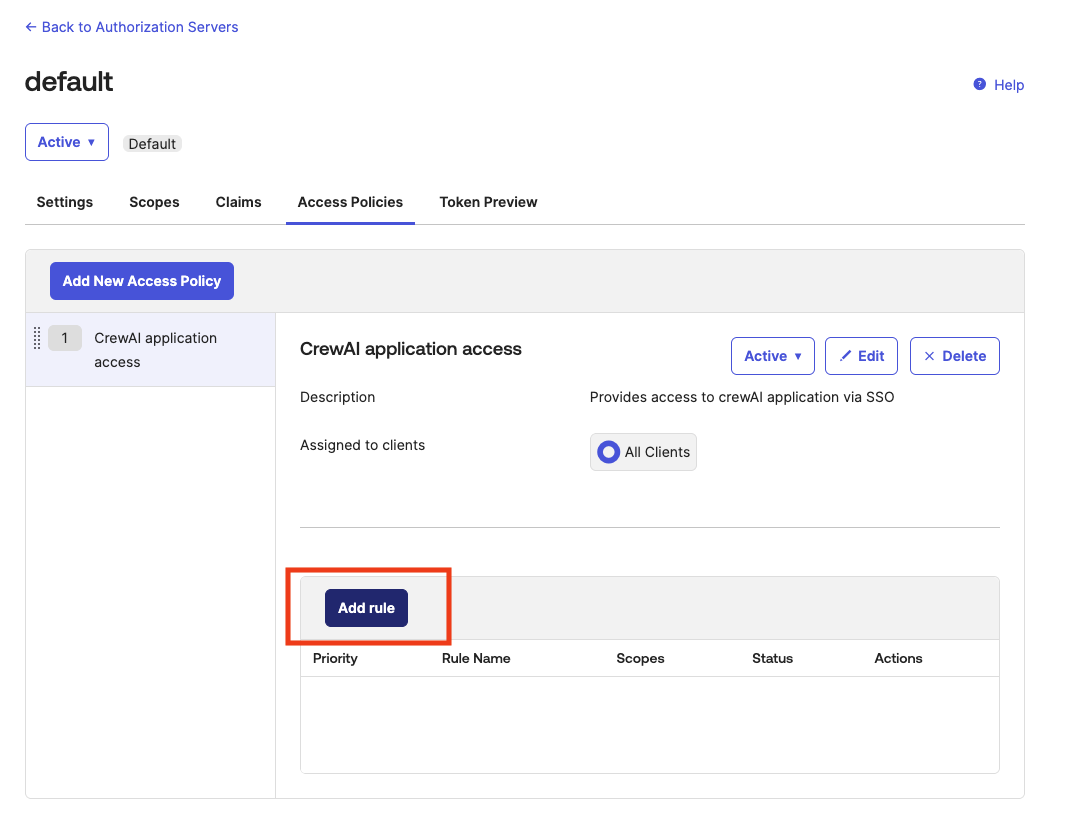
 After adding the policy, click on **"Add rule"** to add a new rule to the Policy.
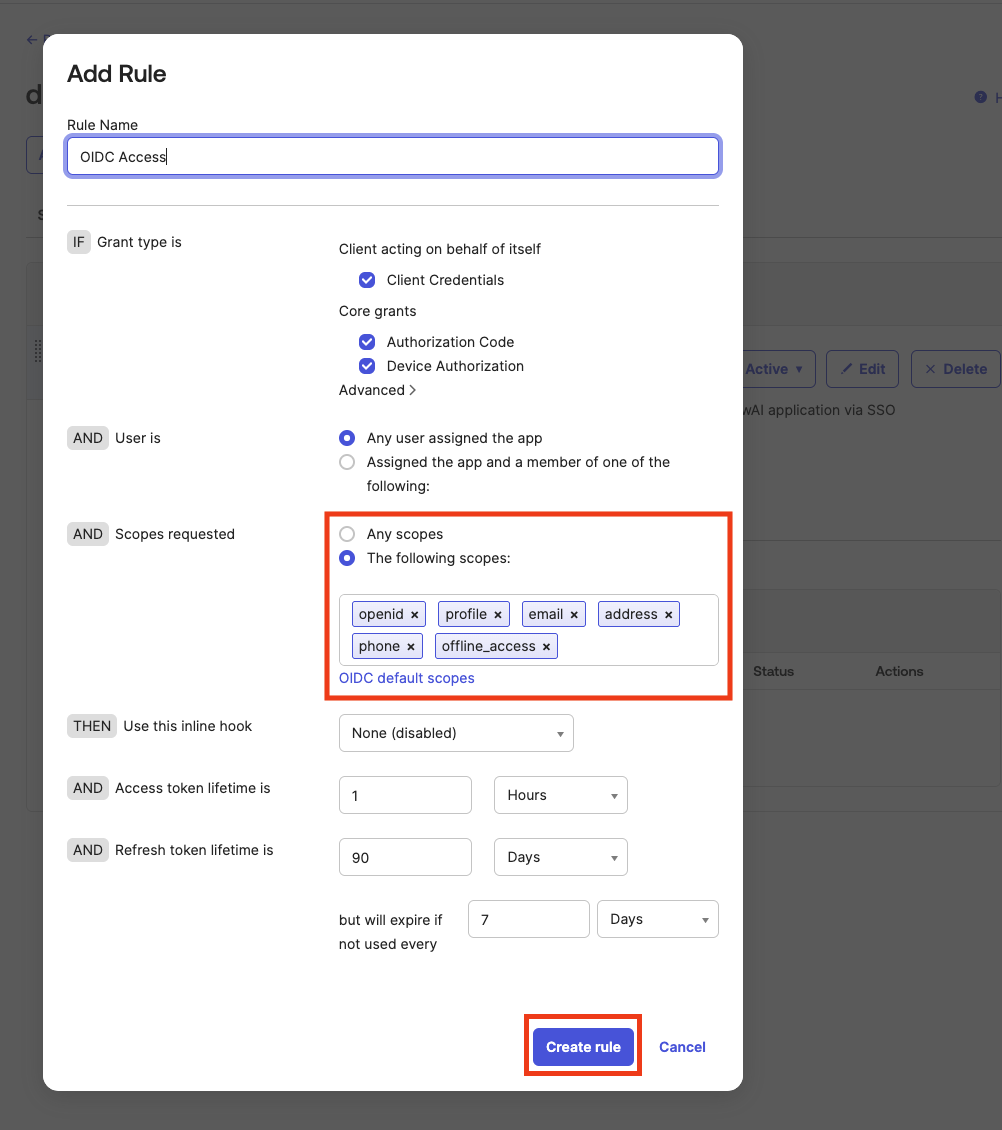
 Leave everything as default, except under **"Scopes requested"** - there, you should click **"The following scopes:"**, and then under the input area, click **"OIDC default scopes"**. Click **"Create rule"** to save.
 ## Helm Values Configuration
OKTA\_SITE, OKTA\_CLIENT\_ID, OKTA\_AUTHORIZATION\_SERVER, and OKTA\_AUDIENCE are non-sensitive identifiers that must be placed under `envVars:`. OKTA\_CLIENT\_SECRET is a credential and must be placed under `secrets:`. The chart template does not render Okta values from `secrets:` — any Okta value under `secrets:` is silently absent from pod environment variables.
```yaml theme={null}
envVars:
AUTH_PROVIDER: "okta"
OKTA_SITE: "https://trial-6682116.okta.com" # From Okta admin URL
OKTA_CLIENT_ID: "0oaqnwji7pGW7VT6T697" # From Client Credentials
OKTA_AUTHORIZATION_SERVER: "default" # Authorization server name
OKTA_AUDIENCE: "api://default" # Audience from auth server
secrets:
OKTA_CLIENT_SECRET: "m4loX_3W3lC7JfCct8LZVb4..."
```
**Environment variable reference (equivalent values):**
```bash theme={null}
AUTH_PROVIDER=okta
OKTA_CLIENT_ID=0oaqnwji7pGW7VT6T697
OKTA_AUDIENCE=api://default
OKTA_CLIENT_SECRET=m4loX_3W3lC7JfCct8LZVb4Lxwyk8XtDSI6am9OybOClgjkTa2ncsZfXyT4YU0uT
OKTA_SITE=https://trial-6682116.okta.com
OKTA_AUTHORIZATION_SERVER=default
```
`oauth.enabled` is NOT required for Okta SSO. Enabling it unnecessarily adds a database pre-creation requirement and deploys an additional microservice. `oauth.enabled` controls the Built-In Integrations service (Gmail, HubSpot, etc.) — it is separate from SSO authentication.
## Combining With Other Features
* **Wharf (trace collection)**: No additional values needed — Wharf is enabled by default. Ensure the `wharf` database is pre-created. See [Wharf reference](/reference/chart-values/wharf).
* **Studio V2**: Configured entirely post-install via the web UI and `kubectl exec` commands. See [Enable Studio V2](/features/studio-v2).
* **Built-in Integrations**: Requires `oauth.enabled: true` and separate OAuth credentials. See [Built-In Integrations](/features/built-in-integrations-overview).
* **ArgoCD / GitOps**: Auto-generated secrets must be set explicitly. See the [ArgoCD guide](/configuration/argocd).
## Configure the CLI to use Okta as your OAuth2 provider
First of all, let's make sure you have a dedicated application to perform the Device Authorization Grant Flow.
To do that, open your Admin Okta console and click in **Create App Integration**
Select **OIDC - OpenID Connect** as the **Sign-in method**, and then **Native Application** as the **Application type**.
Device Authorization is only supported for use with a native application.
## Helm Values Configuration
OKTA\_SITE, OKTA\_CLIENT\_ID, OKTA\_AUTHORIZATION\_SERVER, and OKTA\_AUDIENCE are non-sensitive identifiers that must be placed under `envVars:`. OKTA\_CLIENT\_SECRET is a credential and must be placed under `secrets:`. The chart template does not render Okta values from `secrets:` — any Okta value under `secrets:` is silently absent from pod environment variables.
```yaml theme={null}
envVars:
AUTH_PROVIDER: "okta"
OKTA_SITE: "https://trial-6682116.okta.com" # From Okta admin URL
OKTA_CLIENT_ID: "0oaqnwji7pGW7VT6T697" # From Client Credentials
OKTA_AUTHORIZATION_SERVER: "default" # Authorization server name
OKTA_AUDIENCE: "api://default" # Audience from auth server
secrets:
OKTA_CLIENT_SECRET: "m4loX_3W3lC7JfCct8LZVb4..."
```
**Environment variable reference (equivalent values):**
```bash theme={null}
AUTH_PROVIDER=okta
OKTA_CLIENT_ID=0oaqnwji7pGW7VT6T697
OKTA_AUDIENCE=api://default
OKTA_CLIENT_SECRET=m4loX_3W3lC7JfCct8LZVb4Lxwyk8XtDSI6am9OybOClgjkTa2ncsZfXyT4YU0uT
OKTA_SITE=https://trial-6682116.okta.com
OKTA_AUTHORIZATION_SERVER=default
```
`oauth.enabled` is NOT required for Okta SSO. Enabling it unnecessarily adds a database pre-creation requirement and deploys an additional microservice. `oauth.enabled` controls the Built-In Integrations service (Gmail, HubSpot, etc.) — it is separate from SSO authentication.
## Combining With Other Features
* **Wharf (trace collection)**: No additional values needed — Wharf is enabled by default. Ensure the `wharf` database is pre-created. See [Wharf reference](/reference/chart-values/wharf).
* **Studio V2**: Configured entirely post-install via the web UI and `kubectl exec` commands. See [Enable Studio V2](/features/studio-v2).
* **Built-in Integrations**: Requires `oauth.enabled: true` and separate OAuth credentials. See [Built-In Integrations](/features/built-in-integrations-overview).
* **ArgoCD / GitOps**: Auto-generated secrets must be set explicitly. See the [ArgoCD guide](/configuration/argocd).
## Configure the CLI to use Okta as your OAuth2 provider
First of all, let's make sure you have a dedicated application to perform the Device Authorization Grant Flow.
To do that, open your Admin Okta console and click in **Create App Integration**
Select **OIDC - OpenID Connect** as the **Sign-in method**, and then **Native Application** as the **Application type**.
Device Authorization is only supported for use with a native application.
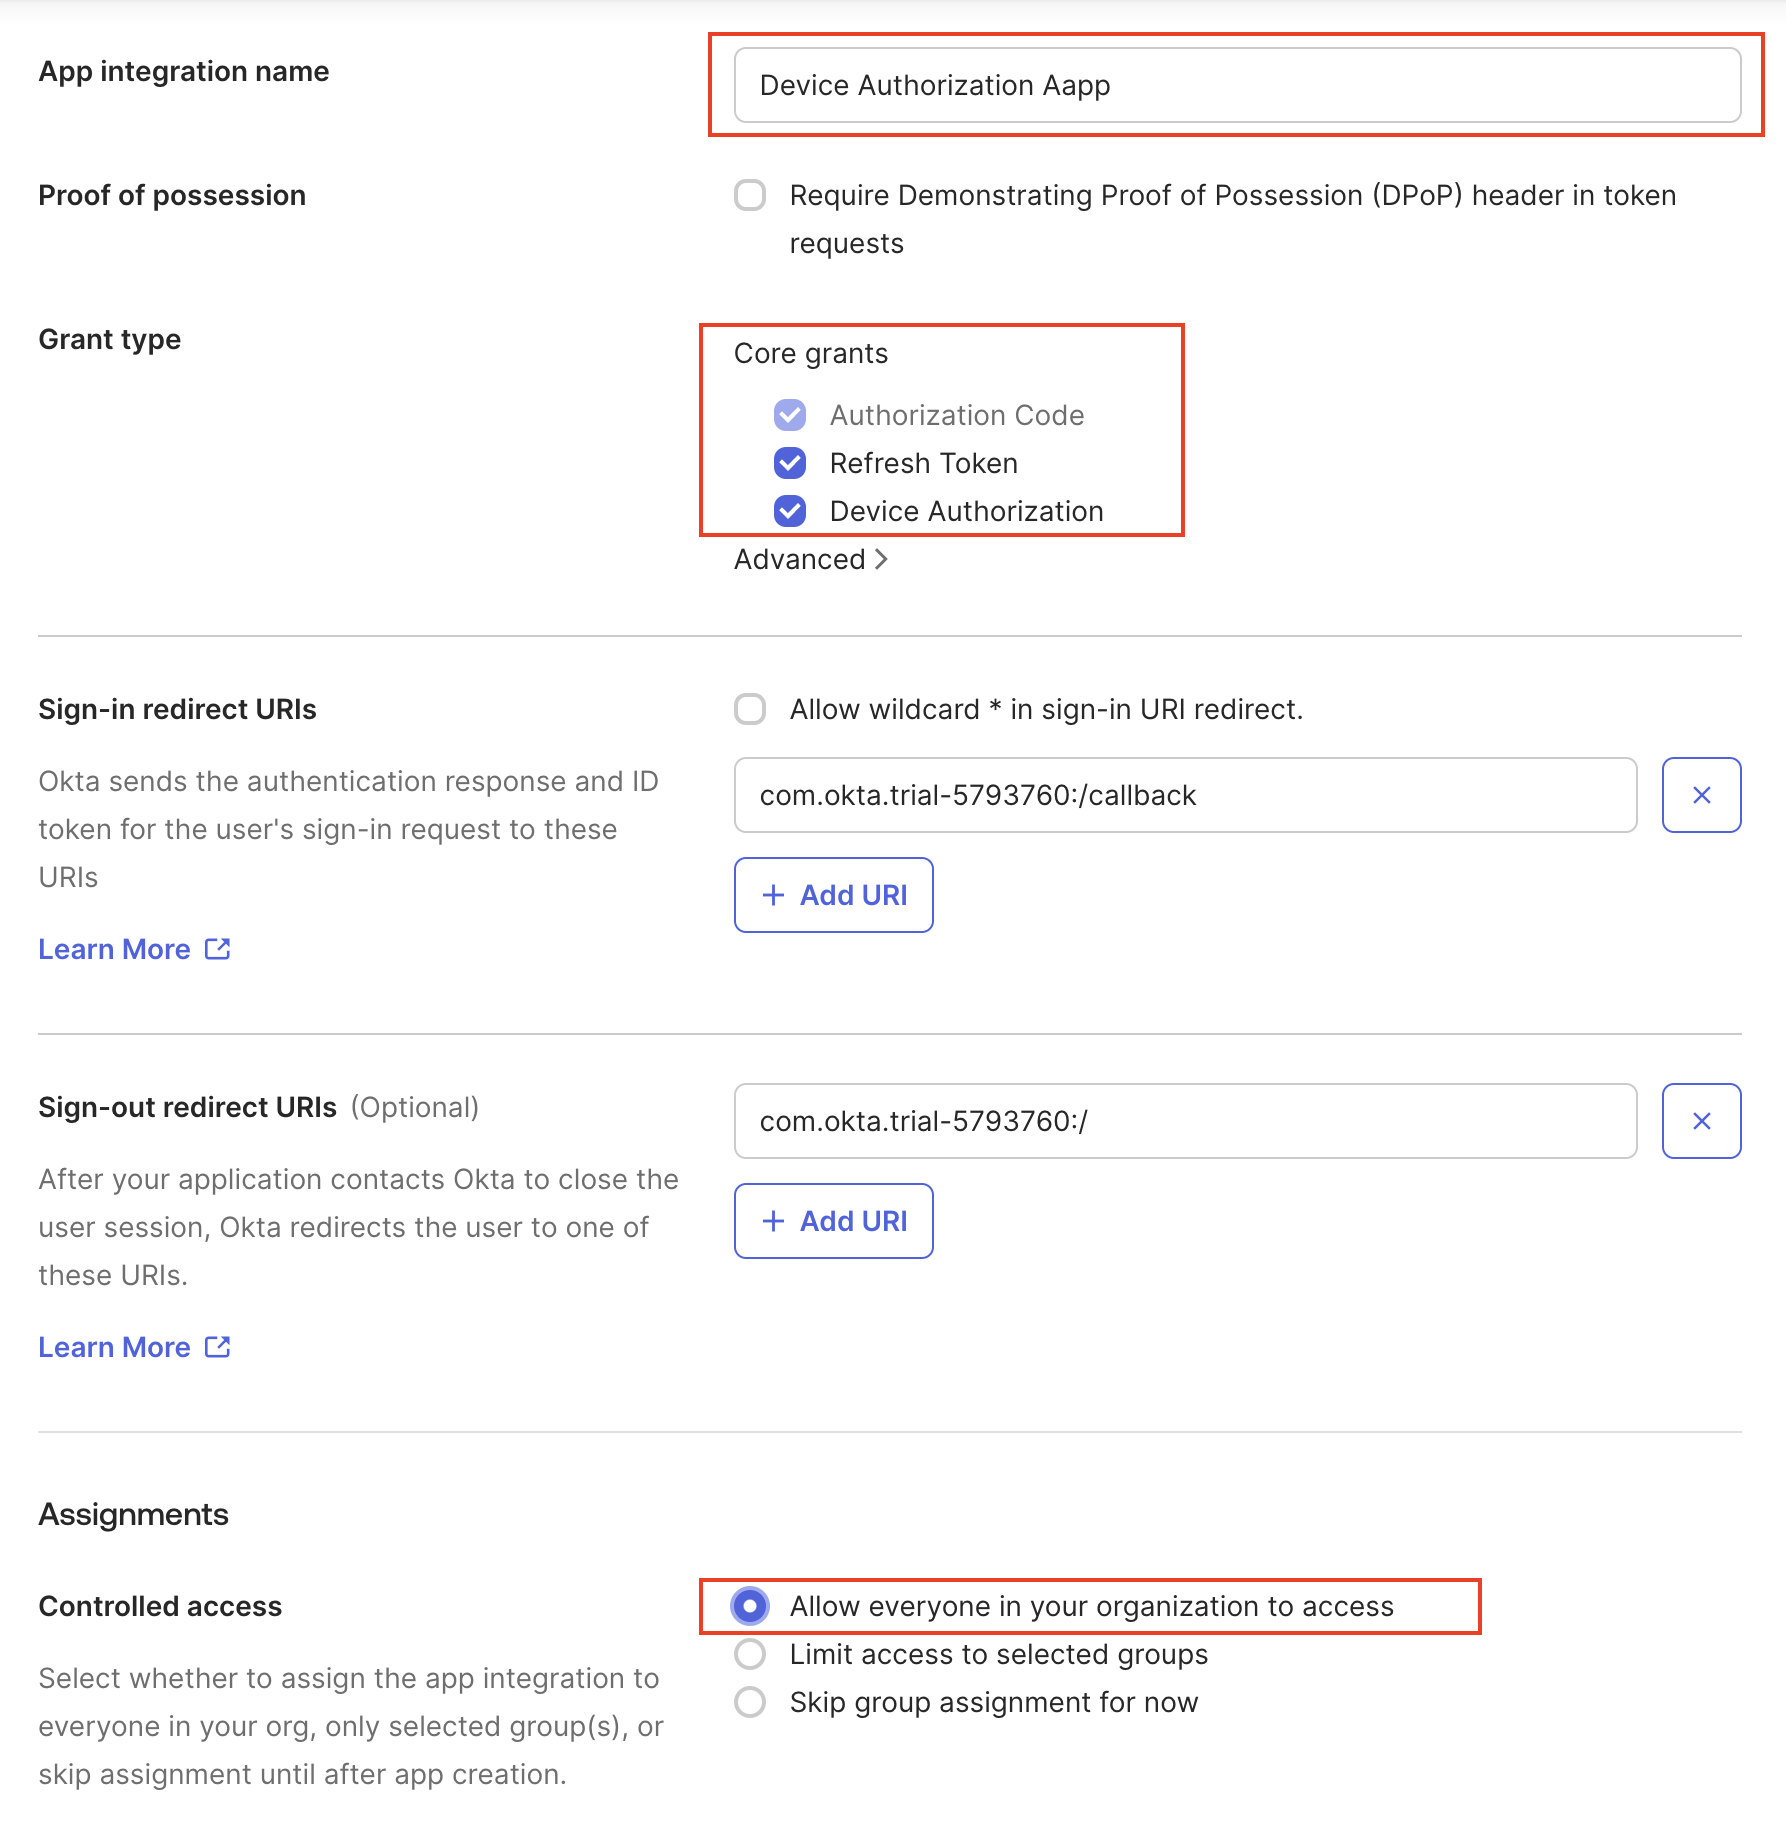
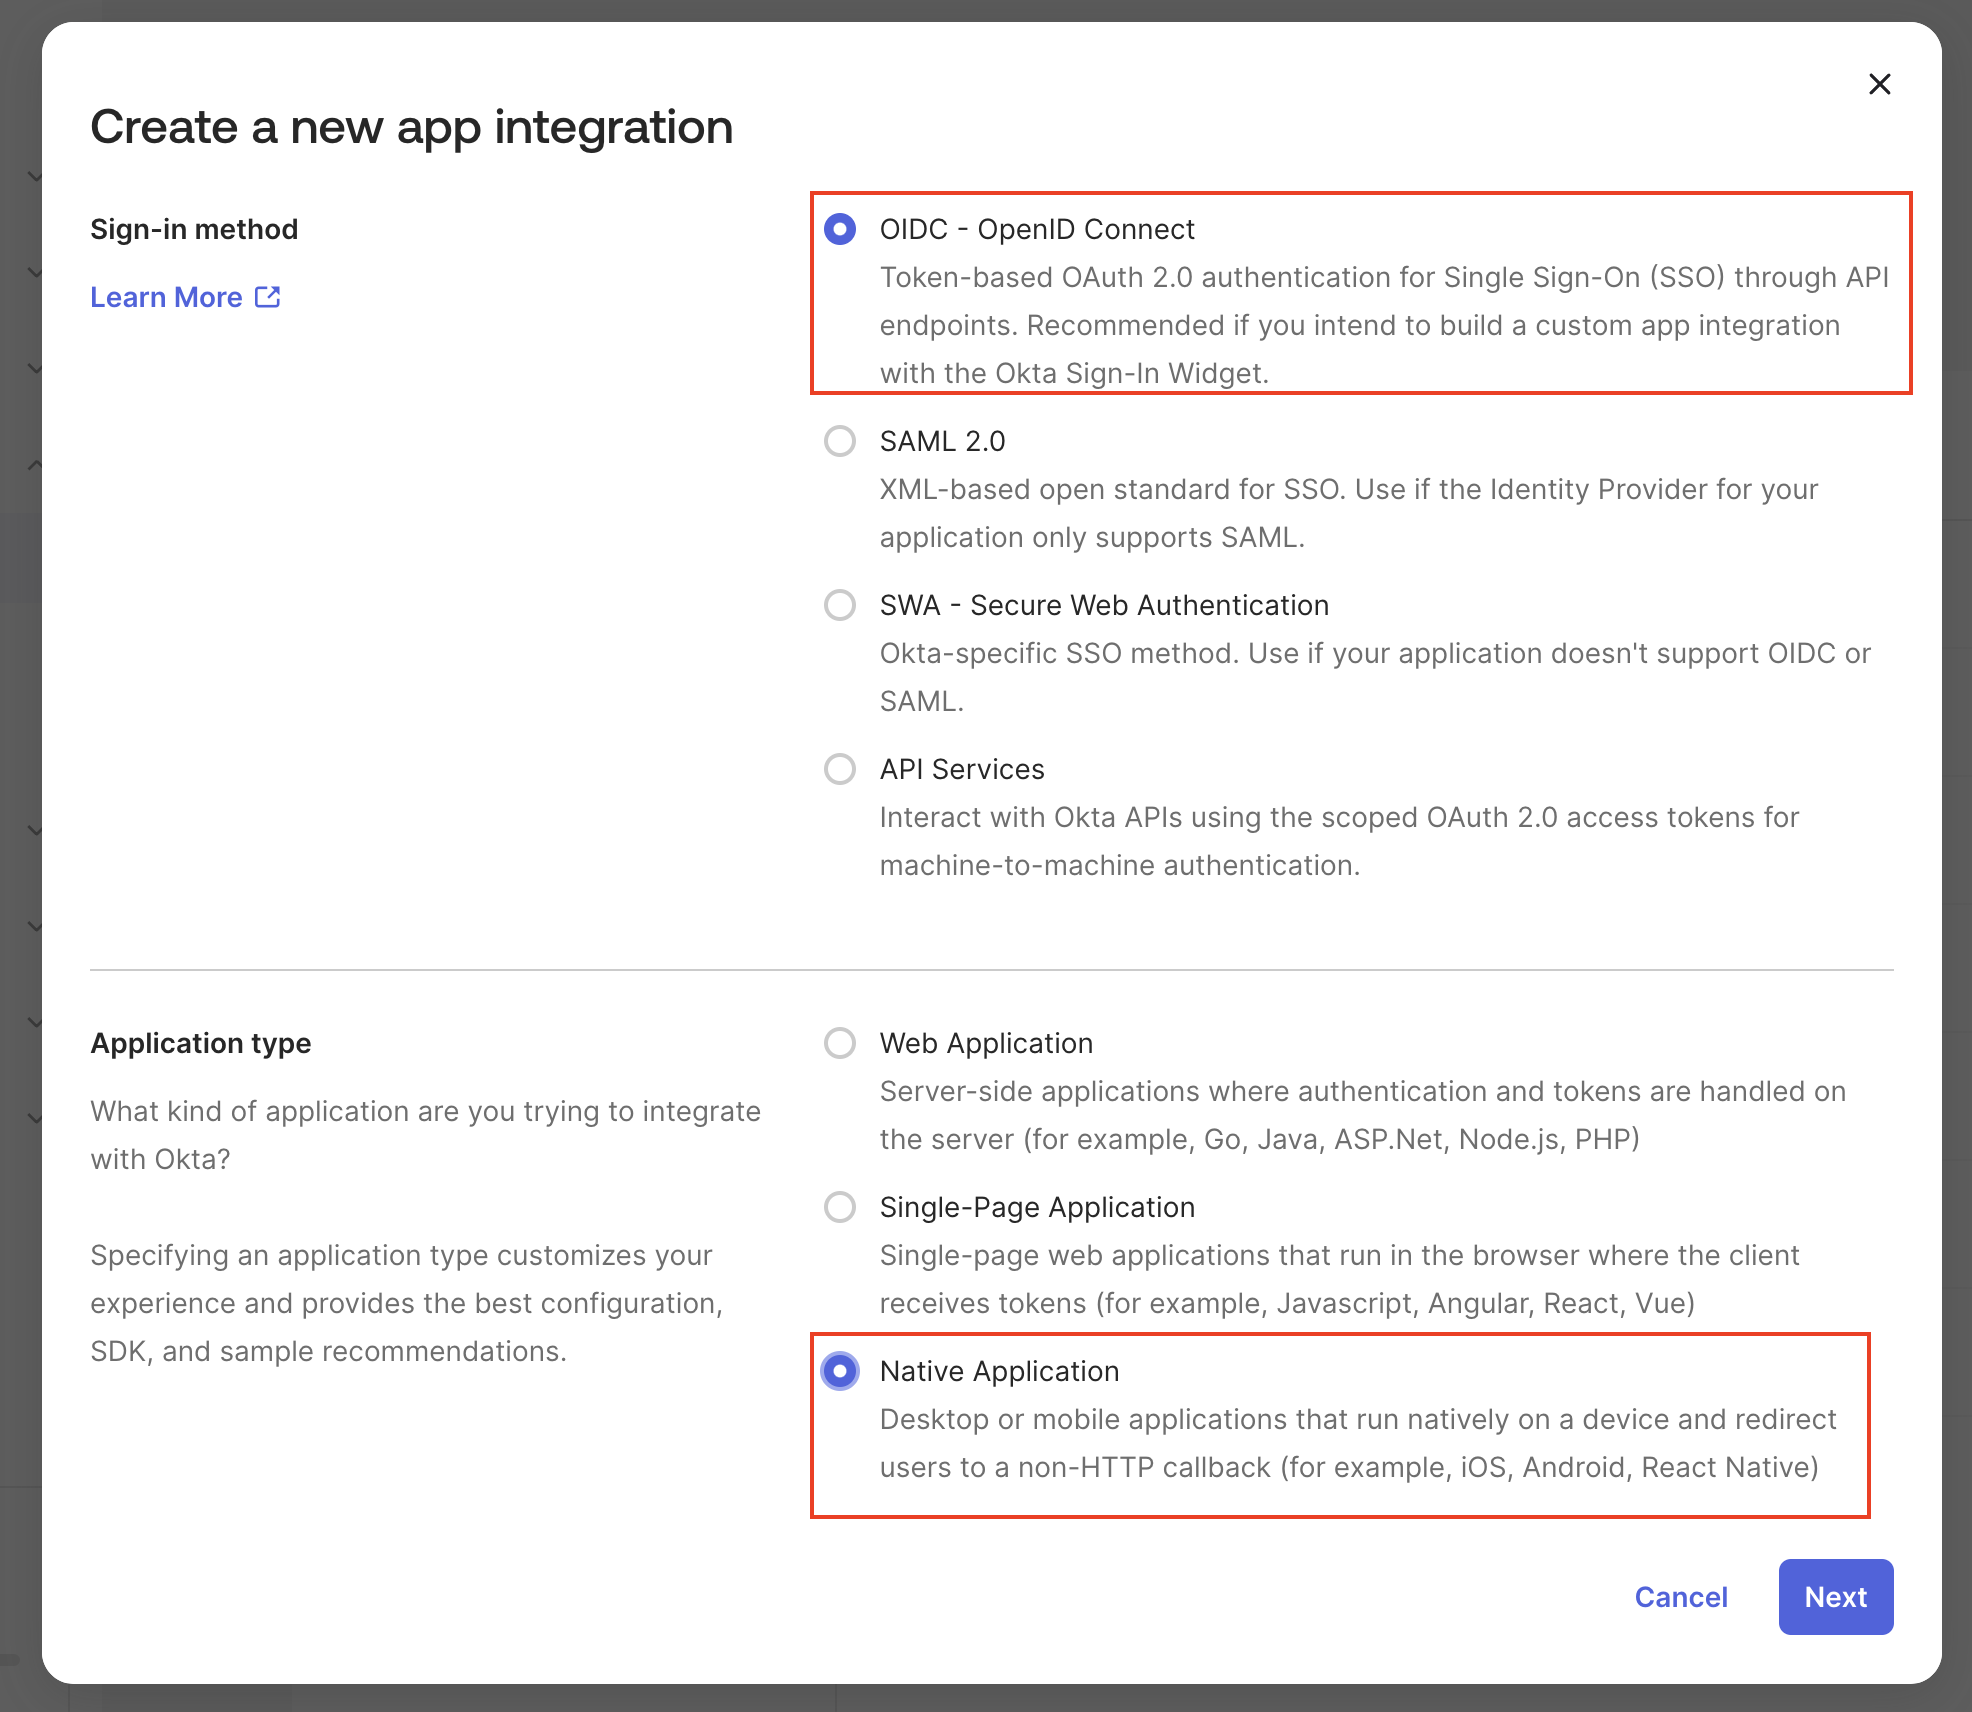 Now, click **Next** and specify the **App integration name**. You must Select **Device Authorization** and **Refresh Token** as the grant types and then select **Allow everyone in your organization to access** in the **Assignments** section. After all is selected, click **Save**.
 Now, set the `OKTA_DEVICE_AUTHORIZATION_CLIENT_ID` environment variable to match the client\_id generated for your app.
```bash theme={null}
OKTA_DEVICE_AUTHORIZATION_CLIENT_ID=0oaqnwji7pGW7VT6231
```
Now you are ready to configure your enterprise CLI login!
Make sure your `crewai` CLI is version 0.159.0 or higher. To configure the Okta provider just run the following command:
```bash theme={null}
crewai enterprise configure https://your-factory-url.app
```
All set! You're now ready to authenticate using Okta:
```bash theme={null}
crewai login
```
Now, set the `OKTA_DEVICE_AUTHORIZATION_CLIENT_ID` environment variable to match the client\_id generated for your app.
```bash theme={null}
OKTA_DEVICE_AUTHORIZATION_CLIENT_ID=0oaqnwji7pGW7VT6231
```
Now you are ready to configure your enterprise CLI login!
Make sure your `crewai` CLI is version 0.159.0 or higher. To configure the Okta provider just run the following command:
```bash theme={null}
crewai enterprise configure https://your-factory-url.app
```
All set! You're now ready to authenticate using Okta:
```bash theme={null}
crewai login
```