Overview
This guide covers the essential steps to create a GitHub OAuth App for CrewAI Factory integration, along with common troubleshooting steps.Basic Setup
1. Navigate to GitHub Developer Settings
For OAuth Apps (recommended for this setup): Personal Account:https://github.com/settings/developers
Organization:
https://github.com/organizations/[ORG-NAME]/settings/applications
Then click “OAuth Apps” → “New OAuth App” or “Register a new application”
2. Register New OAuth Application
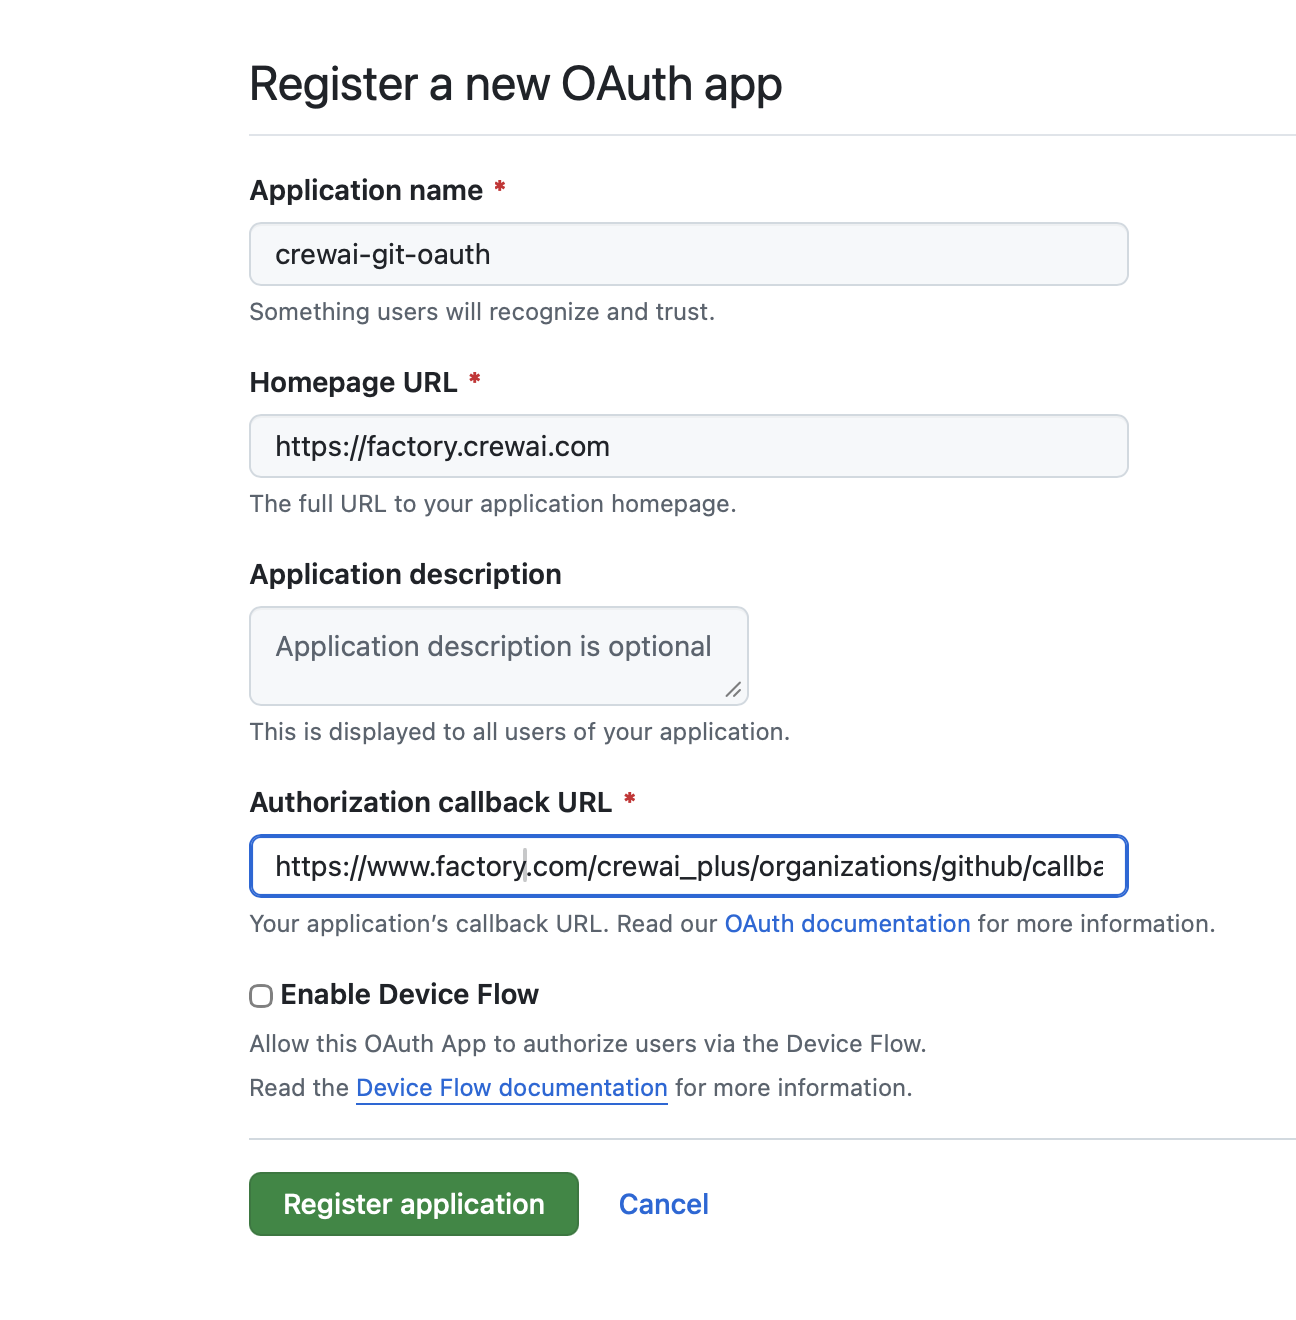
- Application name:
crewai-git-oauth(or your preferred name)- This is what users will recognize and trust
- Homepage URL:
https://factory.crewai.com(or your domain)- The full URL to your application homepage
- Application description: (Optional)
- This is displayed to all users of your application
- Authorization callback URL:
https://www.factory.com/crewai_plus/organizations/github/callback- ⚠️ Critical: This must match your application’s callback endpoint exactly
- ⬜ Leave “Enable Device Flow” unchecked unless specifically needed
3. Register Application
Click “Register application” to create your OAuth app.Retrieving Client Credentials
After creating the OAuth app, you’ll need to generate and retrieve important credentials.Client ID and Client Secret
- Navigate to your OAuth app’s settings page
- The Client ID is displayed prominently
- Click “Generate a new client secret”
- ⚠️ Save both immediately - the client secret is only shown once
For OAuth Apps, you don’t need a private key (that’s only for GitHub Apps). The Client ID and Client Secret are sufficient for OAuth authentication.
Configuring Repository Access
Option 1: Only Select Repositories (Recommended)
- Select “Only select repositories”
- Click “Select repositories” dropdown
- Search and select the repositories you want to integrate with CrewAI Factory
- ✅ Repositories will show with a checkmark when selected
- 🔒 Lock icons indicate private repositories
- 🔔 Yellow “request” badges indicate repositories requiring additional approval

Option 2: All Repositories
- Select this only if you need access to all current and future repositories
- ⚠️ Security consideration: This grants broad access
Verifying Installation
After configuration, you should see:- “Configure GitHub” button in your application
- Connection status showing “No Repositories Available” until repositories are properly connected
- Message: “Add repositories to your GitHub App installation to deploy from them”
- Verify the OAuth app is installed on your account/organization
- Check that repositories are selected in the installation settings
- Ensure IP whitelist includes your application servers (see Troubleshooting section)
Required Permissions
OAuth Apps automatically request permissions during the authorization flow. When users authorize your app, they’ll be prompted to grant access to:Standard OAuth Scopes
The OAuth app will request access based on your application’s needs. Common scopes include:repo- Full control of private repositories (includes read/write access to code, issues, PRs)read:user- Read user profile datauser:email- Access user email addresses
Unlike GitHub Apps, OAuth Apps don’t use fine-grained permissions. Users grant access at authorization time based on the scopes your application requests.
Required Environment Variables
Store these credentials in your environment configuration:Troubleshooting
IP Whitelist Issues
If you encounter authentication connectivity problems, the issue may be related to IP whitelisting.Symptoms
- Unable to authenticate with GitHub
- Connection timeouts or refused connections
- OAuth callback failures
- API requests returning 403 Forbidden errors
Resolution Steps
-
Check Organization IP Allow List
- Navigate to your organization settings
- Go to Settings → Security → IP allow list
- Verify that your server/application IP addresses are whitelisted
-
Identify Your Application’s IP Address
-
Add IP to GitHub Allow List
- In GitHub organization settings, go to Security
- Click “IP allow list”
- Click “Add IP allow list entry”
- Enter your application’s IP address or CIDR range
- Add a description (e.g., “CrewAI Factory Production Server”)
- Click “Add”
-
Verify the Configuration
- Test the OAuth flow again
- Check that API calls are succeeding
- Monitor logs for any remaining connection issues
Common IP Whitelist Scenarios
- Cloud Deployments: If using AWS, GCP, or Azure, you may need to whitelist elastic/static IP addresses
- Load Balancers: Whitelist the load balancer’s outbound IP addresses
- Multiple Environments: Ensure dev, staging, and production IPs are all whitelisted
- Dynamic IPs: Consider using IP ranges (CIDR notation) or setting up static IPs
Additional Security Considerations
If your organization has strict IP allow list policies:- Coordinate with your security team before making changes
- Document all whitelisted IPs and their purposes
- Regularly audit and remove unused IP entries
- Consider using OAuth App restrictions if available